Red Hat Service Interconnect Example: Open5GS Deployment on Multi-Private Clusters
Author: Motohiro Abe
Table of Contents- Introduction
- Before We Get Started
- Architecture
- Prerequisites
- Skupper Setup
; - Public Cluster
; - Private A Cluster
; - Private B Cluster
- Open5GS Installation
; - Public Cluster
; - Private A Cluster
; - Private B Cluster
; - Provision a Subscriber
; - Check UE logs
; - Service Interconnect
- Conclusion
Introduction
Red Hat Service Interconnect 1.5 has recently reached the general availability. Built upon the upstream Skupper.io project, it enables secure communication across Kubernetes clusters with no VPNs or special firewall rules.
Open5GS is an open-source project enabling the construction and testing of 5G Core elements. Notably, Open5GC now aligns with 3GPP Release-17.
In this blog post, I will demonstrate the deployment of Open5GC elements across two OpenShift private clusters. Subsequently, I will utilize a public cluster as a relay cluster via Skupper. This setup will emulate a scenario where two vendors can efficiently conduct interoperability testing without the need for VPNs or complex setups involving multiple organizations and network elements.
Specifically, this blog will explore how Open5GS, including SCP (Service Capability Exposure Function), facilitates indirect communication within a Service-Based Architecture (SBA). NF (Network Function) discovery will occur through SCP, operating seamlessly across the two private clusters.

Before We Get Started
Before delving into the deployment process, I'd like to express my gratitude to the various blogs and GitHub repositories that have contributed immensely to my learning journey. Leveraging the insights gleaned from these resources, I successfully built the Open5GS container (version 2.7.0) and crafted the deployment manifest.
- Kubernetes Open5GS Deployment
- Open5Gs and UERANSIM
- Open Source 5G on OpenShift Container Platform with Service Mesh
I've stored all the manifests in my Git repository. Please refer to detail deployment.
Architecture
Let's start with an overview of the high-level architecture. The setup consists of three clusters: one public cluster accessible to each private cluster, serving as a relay router, and two private clusters situated behind firewalls.
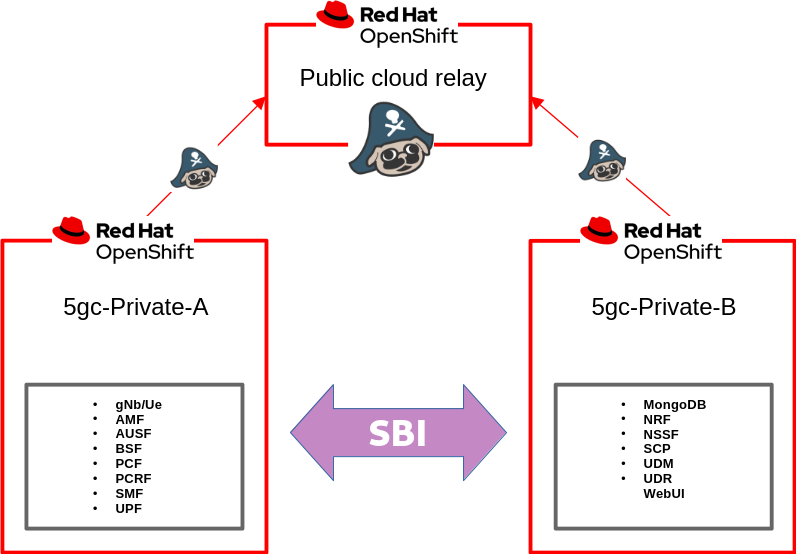
UERANSIM, the UE/gNodB simulator, operates within the on-premises cluster "5gc-private-A," alongside components such as AMF, SMF, AUSF, and UPF. Subscriber data provisioning occurs on the UDM, which runs within the on-premises cluster "5gc-private-B." These clusters are interconnected via a relay site hosted in the public cloud.
Prerequisites
Before proceeding, ensure the following prerequisites are met:
- The SCTP module is loaded on Private Cluster A, where UERANSIM and AMF are located.
- All three clusters are up and running, and you have been assigned the cluster-admin role.
- The Service Interconnect operator has been installed. If not, please refer to the production documentation for installation instructions.
- Skupper CLI is available. Install the Skupper command-line tool using the following command:
curl https://skupper.io/install.sh | sh
Skupper Setup
To begin, open three terminals, one for each cluster. Ensure that you are operating within the correct cluster context. If you are using a single kubeconfig, remember to switch the context accordingly.
First, let's set up a namespace and instantiate the Skupper router within it. Then, we'll create links between the clusters.
Additionally, we will install the Service Interconnect web console in the private-B cluster.
Public Cluster
On the public cluster, we will create a token for the Relay.
- Create a Namespace.
- Install the Skupper router.
- Generate tokens for the Relay.
$ oc new-project 5gc-public

$ skupper init --site-name 5gc-public

$ skupper token create ~/relay-private-a.yaml

$ skupper token create ~/relay-private-b.yaml
Private A cluster
$ oc new-project 5g-public-a

$ skupper init

$ skupper link create ~/relay-private-a.yaml
Here is the example outputs that shows the link status from the perspective of the Public Cluster, it has received an incoming link from the Private A cluster.
$ skupper link status

Links created from this site:

	 There are no links configured or connected

Current links from other sites that are connected:

	 Incoming link from site eda4bdf3-97cd-4a1d-807e-6bbae8740878 on namespace 5g-private-a
Private B Cluster
$ oc new-project 5g-private-b

$ cat <<EOF | oc apply -f -
apiVersion: v1
kind: ConfigMap
metadata:
  name: skupper-site
data:
  console: "true"
  flow-collector: "true"
  console-user: "admin"
  console-password: "changeme"
EOF

$ skupper link create ~/relay-private-b.yaml
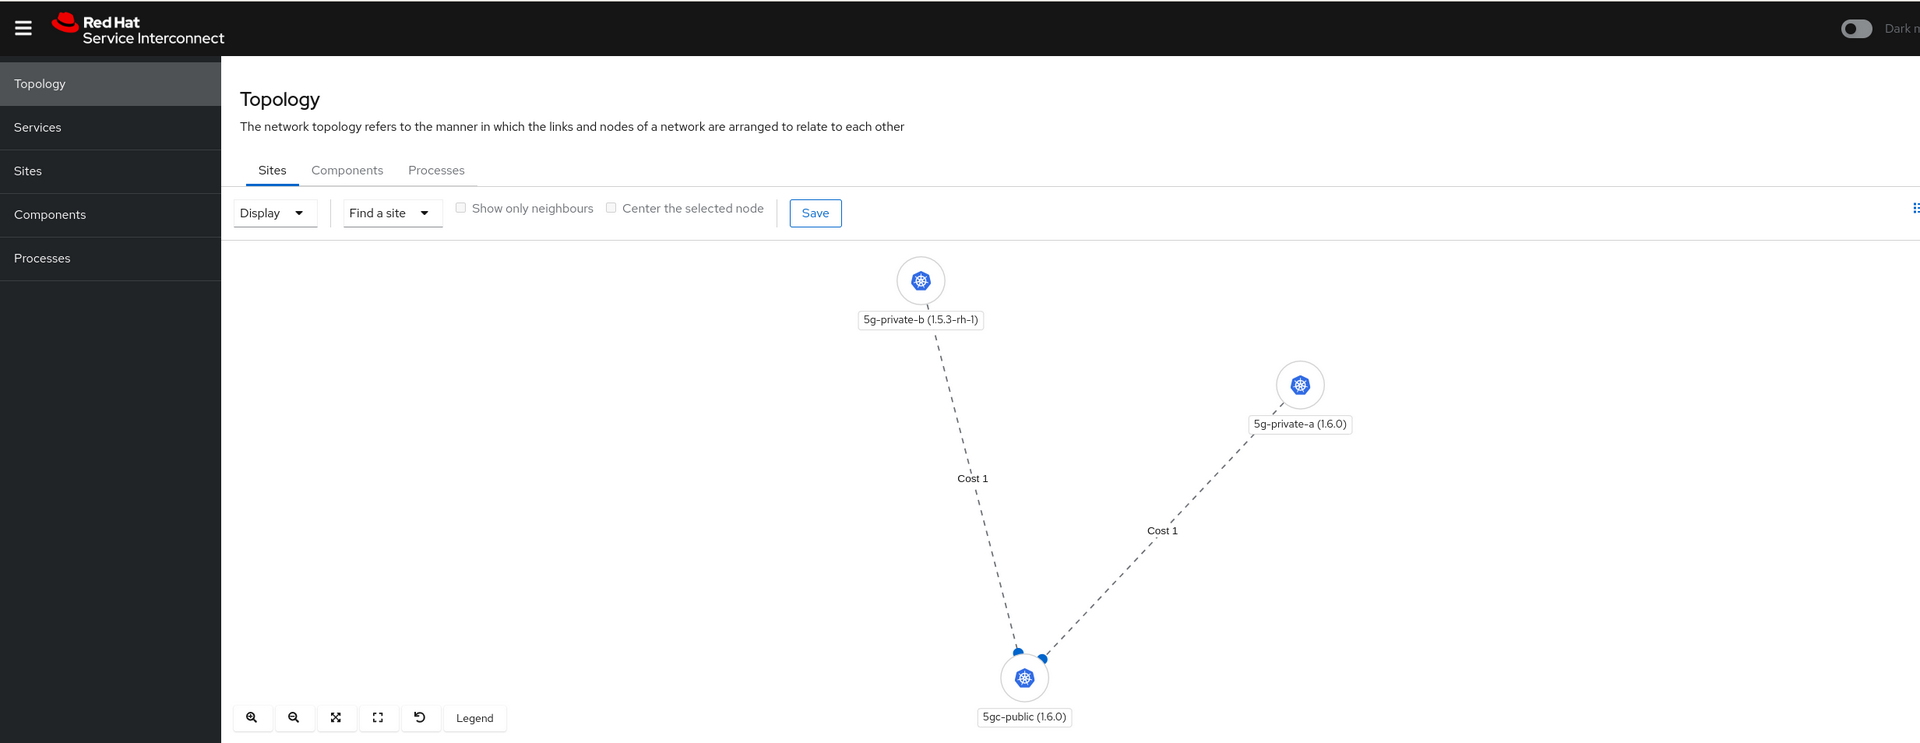
The service interconnect operator will create the web console and we should see the network topology in the console.
You can find the URL with the following command.
$ oc get route skupper
Very the link status from Public cluster console.
$ skupper link status

Links created from this site:

	 There are no links configured or connected

Current links from other sites that are connected:

	 Incoming link from site eda4bdf3-97cd-4a1d-807e-6bbae8740878 on namespace 5g-private-a
	 Incoming link from site 89673f0d-9b7e-482e-8a20-87963ad9aabd on namespace 5g-private-b
Open5GS Installation
Please clone the git repository:
$ git clone https://github.com/mabehiro/open5gs-skupper.git
Make sure you are in the right kubeconfig context in the following steps.
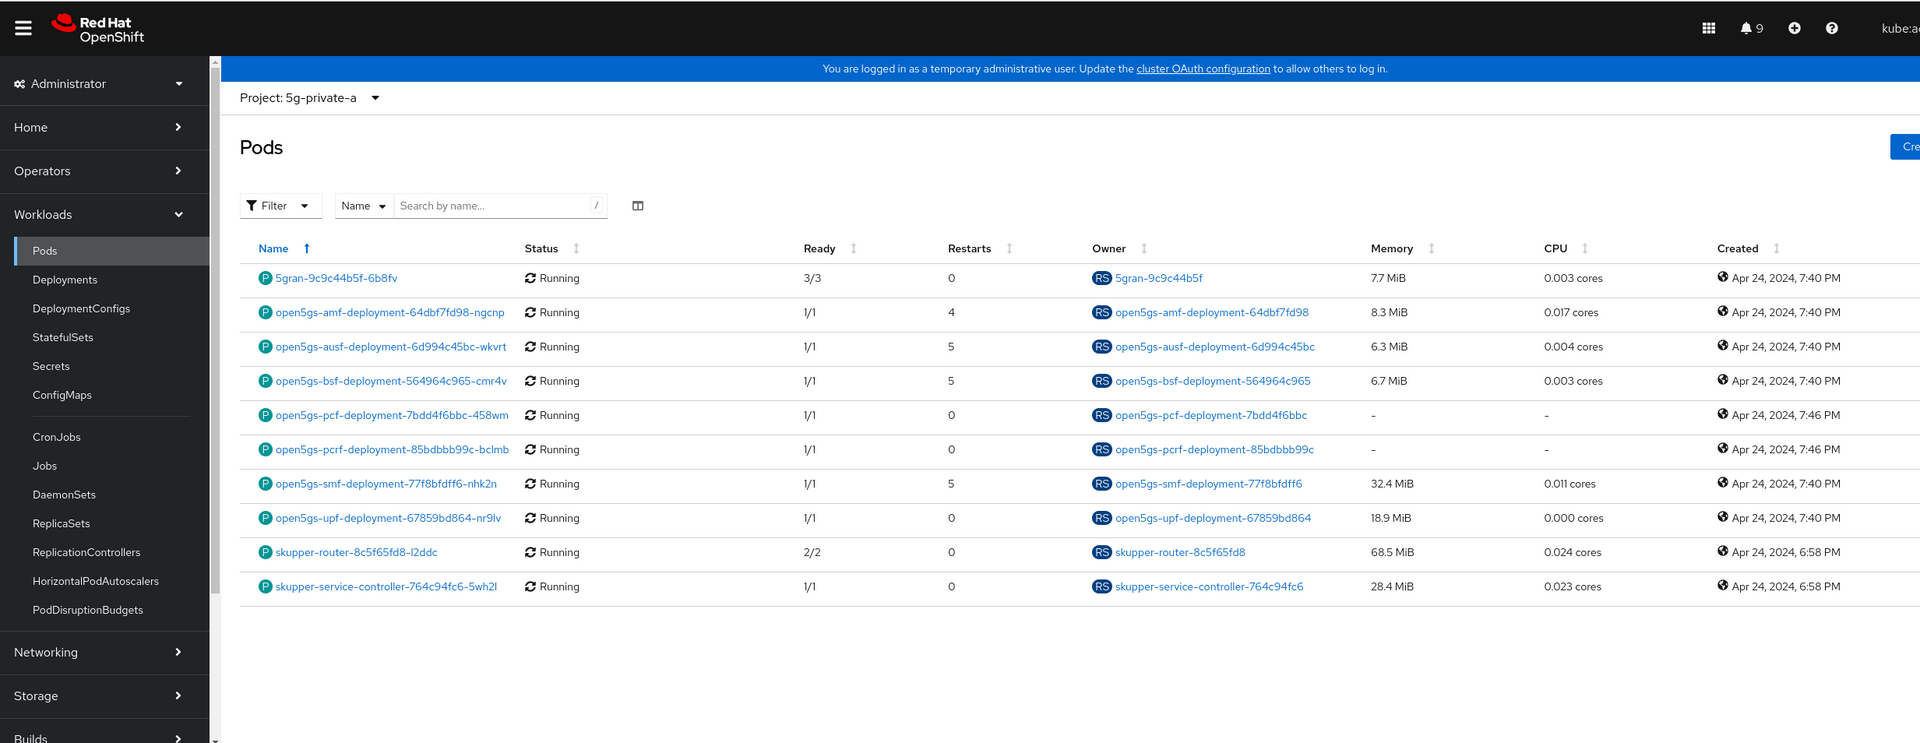
Private Cluster A
For simplicity and lab purposes, add policies to the default ServiceAccount of the namespace:
$ cd open5gs-skupper/5gc-private-A
# oc project 5g-private-a
$ oc adm policy add-scc-to-user anyuid -z default
$ oc adm policy add-scc-to-user hostaccess -z default
$ oc adm policy add-scc-to-user hostmount-anyuid -z default
$ oc adm policy add-scc-to-user privileged -z default
To install 5GC workloads using Helm, you can use the following command:
helm install -f values.yaml 5g-private-a ./
To expose services to other clusters using Skupper, you can use the skupper expose command with the appropriate parameters. Here's how you can expose each service with their corresponding Skupper addresses:
$ skupper expose service/open5gs-amf --address open5gs-amf-skupper
$ skupper expose service/open5gs-ausf --address open5gs-ausf-skupper
$ skupper expose service/open5gs-bsf --address open5gs-bsf-skupper
$ skupper expose service/open5gs-pcf --address open5gs-pcf-skupper
$ skupper expose service/open5gs-smf --address open5gs-smf-skupper
This will expose each service using Skupper with the specified addresses.
Within the Helm templates, there are ConfigMaps for each NF, each containing references to the services exposed by Skupper.
We will repeat similar steps on Private Cluster B.
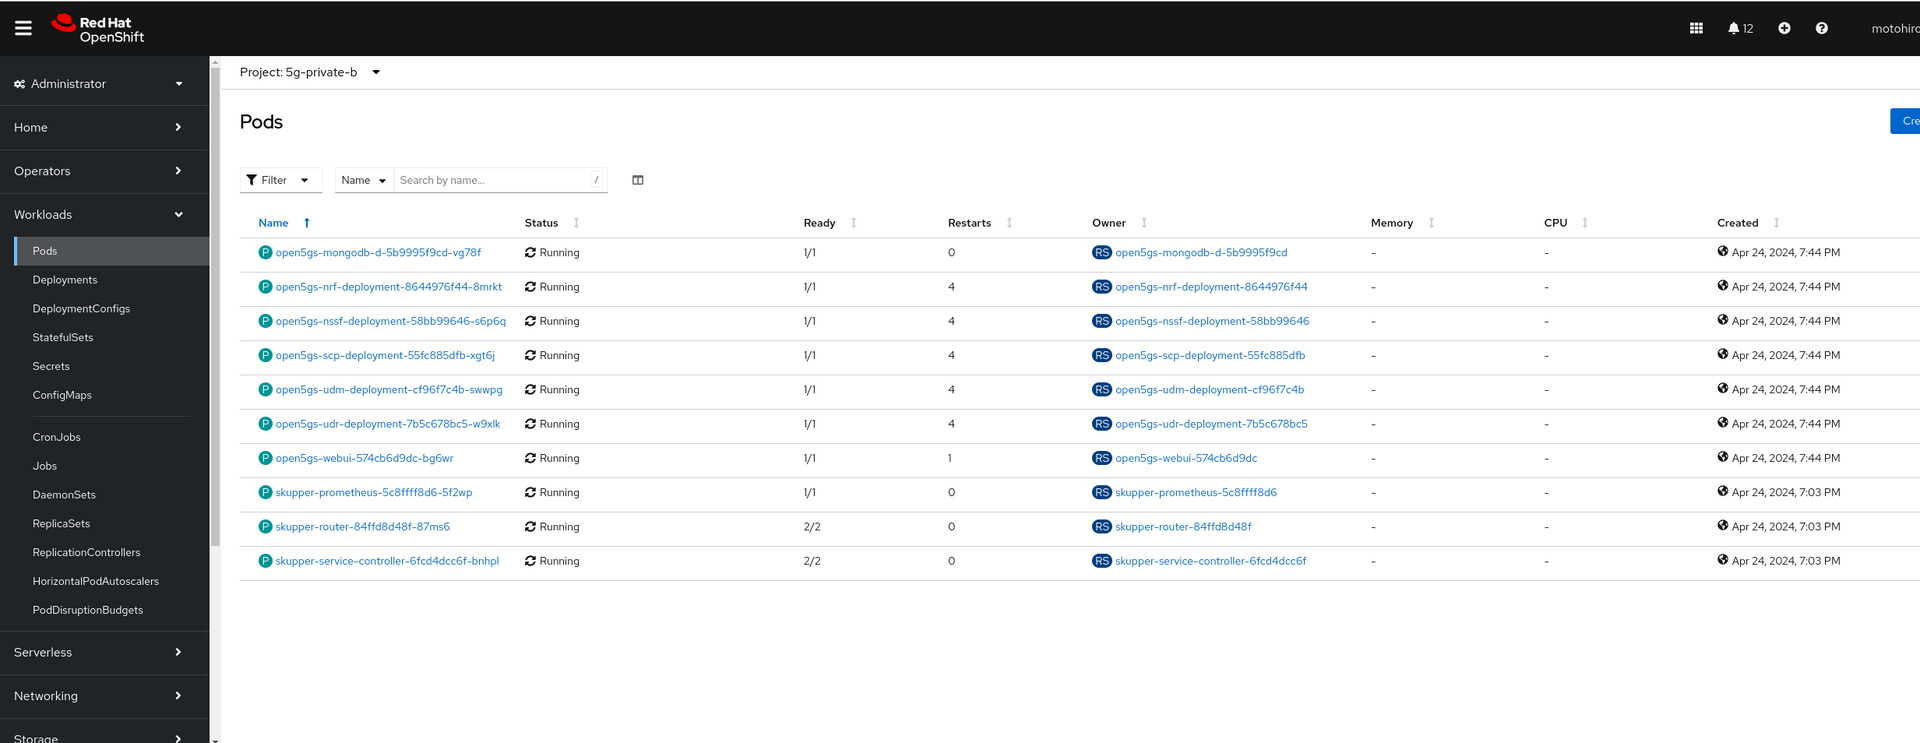
Private Cluster B
$ cd open5gs-skupper/5gc-private-B
# oc project 5g-private-b
oc adm policy add-scc-to-user anyuid -z default
oc adm policy add-scc-to-user hostaccess -z default
oc adm policy add-scc-to-user hostmount-anyuid -z default
oc adm policy add-scc-to-user privileged -z default
helm install -f values.yaml 5g-private-b ./
skupper expose service/mongodb-svc --address mongodb-svc-skupper
skupper expose service/open5gs-nrf --address open5gs-nrf-skupper
skupper expose service/open5gs-nssf --address open5gs-nssf-skupper
skupper expose service/open5gs-scp --address open5gs-scp-skupper
skupper expose service/open5gs-udm --address open5gs-udm-skupper
skupper expose service/open5gs-udr --address open5gs-udr-skupper
Give some time for these pods on each cluster to settle. You might encounter some crashes, but you can simply restart those pods
Provision a Subscriber
Now it is time to provision a subscriber.
First, expose the open5gs-webui service, and then we can proceed to provision a subscriber.
Private B Cluster
$ oc expose svc/open5gs-webui
If you encounter issues with the web UI build, please refer to this article. The default username and password are admin/1423.
Access the GUI, and then proceed to provision a subscriber (208930000000001).
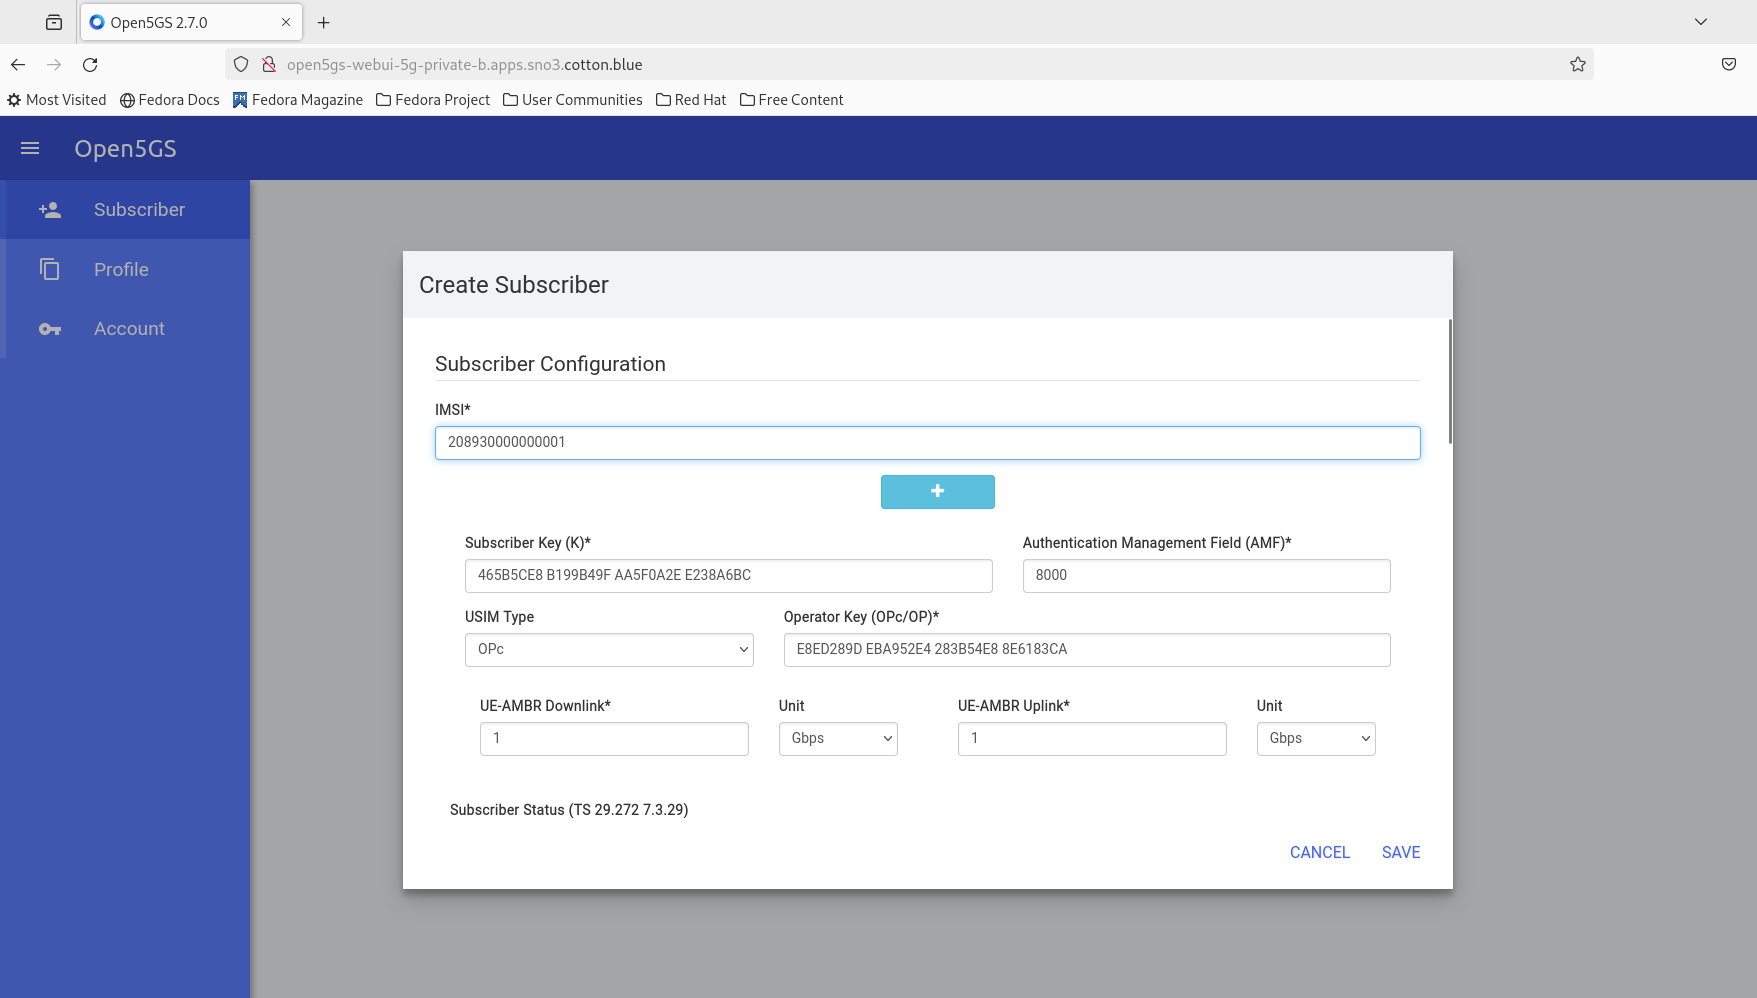
After provisioning the subscriber, restart the 5gran pod, and monitor the logs (gnb and ue container) to observe what happens.
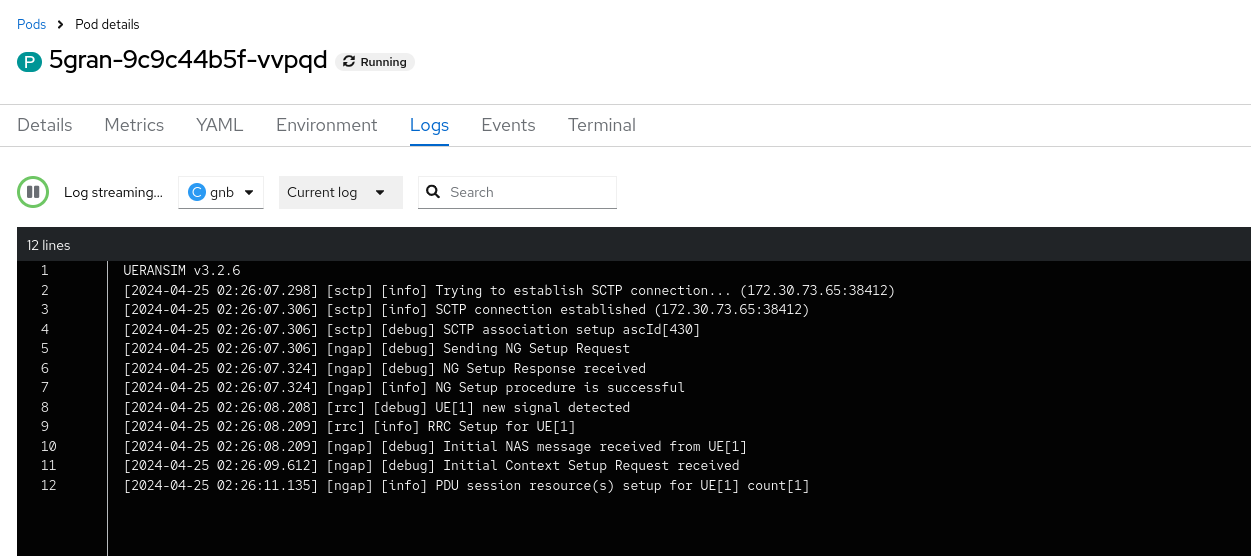
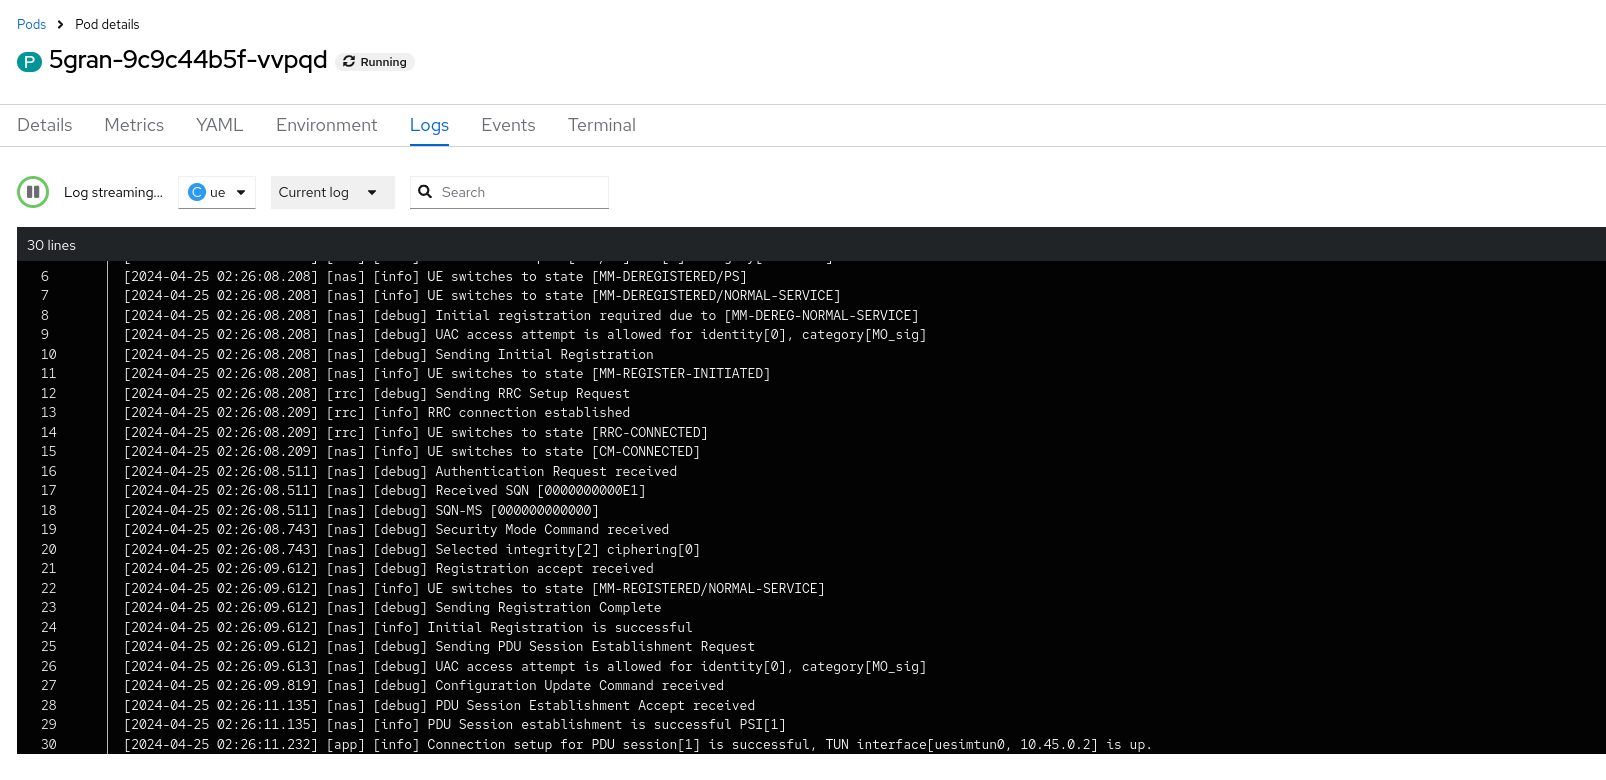
Check UE Logs
We might need to restart the UERANSIM pod, but once the pod finds the AMF, and the AMF finds the AUSF through SCP, after the UE's registration, we should be able to see PDU session messages along with TUN interface information in the log.
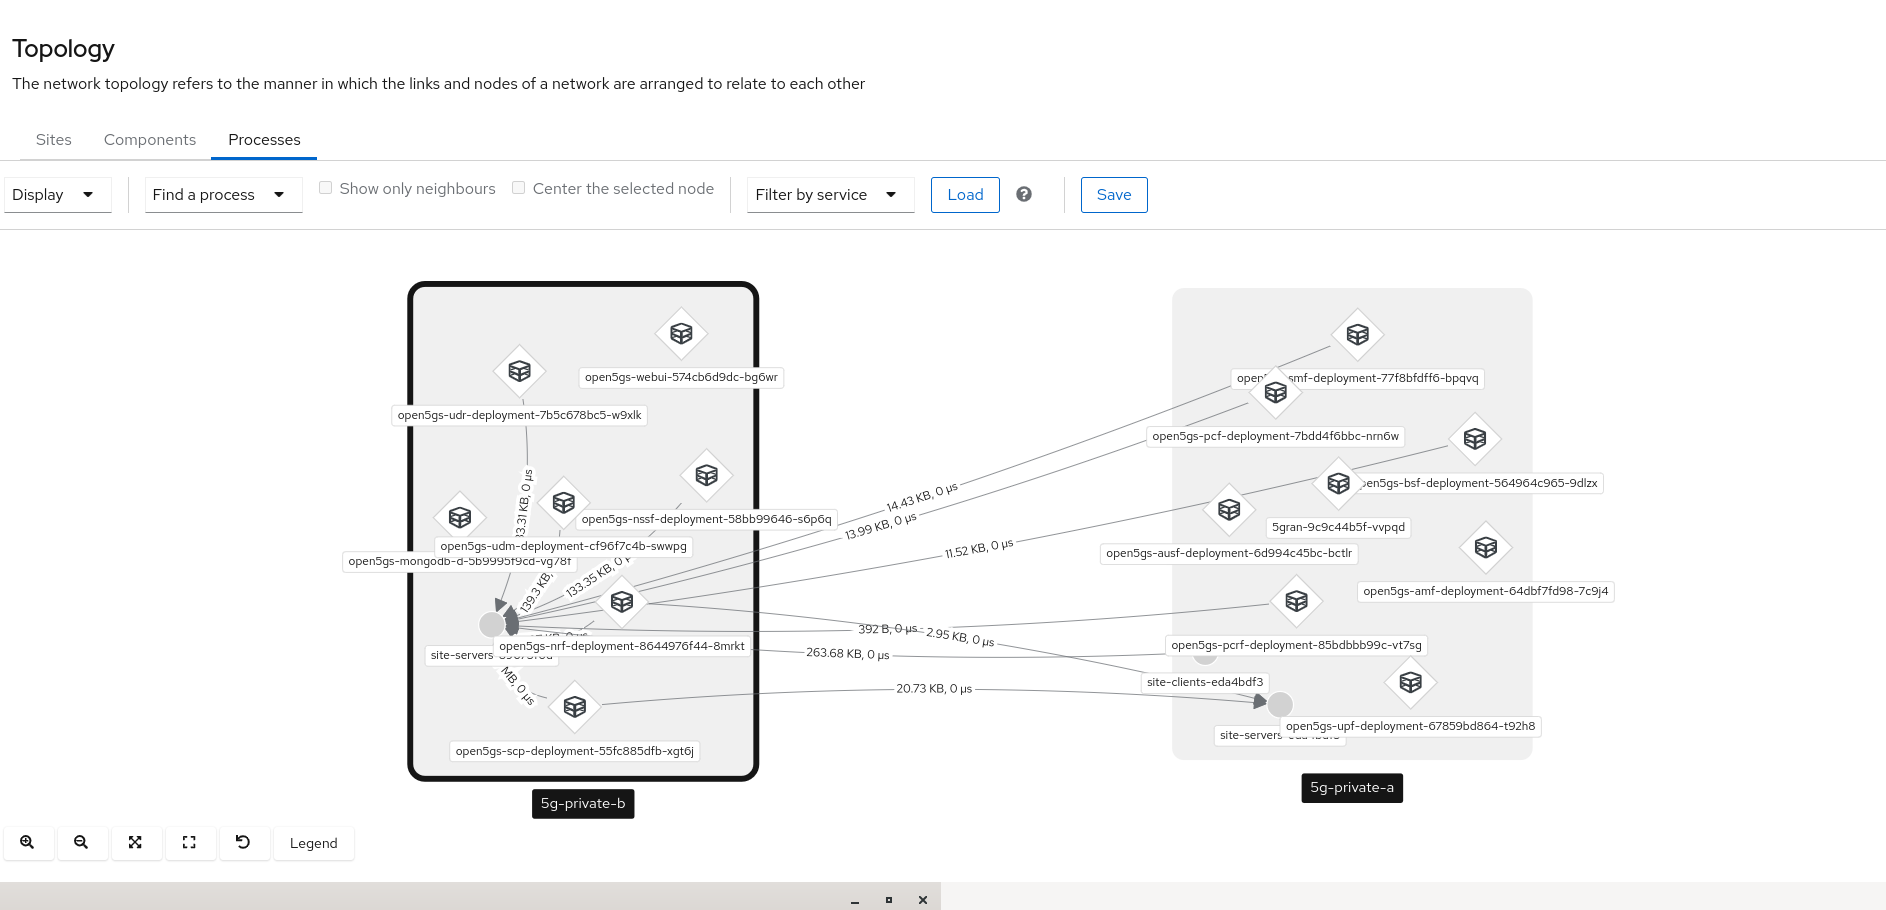
Service Interconnect Console
Okay, so what can we see from the Service Interconnect console? The Service Interconnect GUI should be able to display the network topology view. 5GC NFs are interconnected each other even they are in differenent prviate cluster thanks to public relay cluster.
Conclusion
This exercise proved to be very beneficial for me. Building the Open5GS v2.7 container images was necessary to incorporate SCP functionality. Additionally, we successfully set up a relay scenario that connects two edge on-premise private clusters. I believe this exercise demonstrates how Service Interconnect can facilitate quick Interoperability Testing among different sites, leveraging just one public cloud to bridge them.
If you have any questions or encounter difficulties, please don't hesitate to reach out to me. I appreciate any suggestions for improvement.