OpenShift Image Based Installation Tutorial Part1
Author: Motohiro Abe
Introduction
The Image-Based Installation (IBI) is a powerful and efficient way to deploy a Single Node OpenShift (SNO) cluster, especially in edge environments.
When combined with SiteConfig and GitOps, it enables a streamlined, automated, and reproducible deployment process.
In this first part of the tutorial, I’ll walk through the bare minimum setup for installing a Single Node OpenShift cluster using IBI.
We’ll focus on the core components and how to stage the cluster using an installation ISO generated by a seed cluster.
Once the staged server is physically delivered to the remote site, a second configuration ISO is used to finalize the setup. Boot from that ISO and the node comes up as a fully configured cluster—with site-specific settings.
In Part 2, I’ll go further with Advanced Cluster Management (ACM), ClusterInstance, and PolicyGenerator to enable a GitOps-driven Zero Touch Provisioning (ZTP) workflow.
But first, let’s break it down.
As always, for our ultimate guide, check the official docs:
- Red Hat Advanced Cluster Management – SiteConfig operator
- Image-Based Installation for Single Node OpenShift
- Image-based installation is easier and faster
Steps Overview
In this tutorial, the main tool we'll use is the openshift-install program.
-
Prepare the Seed Cluster
A Seed Cluster is a dedicated Single Node OpenShift (SNO) cluster used to generate the seed image.It should be running the same version of OpenShift as your target cluster.The seed cluster should match the target environment in key areas such as CPU topology and IP version.Be sure to follow Red Hat’s official guidelines for compatibility. -
Generate a Seed Image with the Lifecycle Agent
Use the Lifecycle Agent on the seed cluster to create the seed image, which will be pushed to your image registry.
This image will later be used to create the installation media for the target SNO. -
Preinstall SNO
Create a live installation ISO for the preinstallation of your SNO cluster on the target bare-metal host. Once installation completes, the server is ready to ship to the remote site. -
Generate a Configuration ISO
Use the openshift-install tool to generate a configuration ISO, which contains the site-specific settings.
Ship this ISO alongside the preinstalled server. -
Deploy the SNO
At the remote site, boot the server using the configuration ISO. The system will automatically complete the configuration process, applying the site-specific settings.
Let’s get started!
Create Seed SNO
This is where it all begins.
According to the Seed Cluster Guidelines, we must configure a shared container partition as part of the seed cluster deployment.
We’ll also install Day 2 operators, including the Lifecycle Agent, in the seed cluster. At this stage, we only install them—we don’t configure them yet.
Tip: Take a look at the Seed Image Configuration Table for important image and partition requirements.
Seed SNO Install
For this tutorial, I’ll use the Assisted Installer to deploy the Seed SNO cluster.
During the setup process, we can include an extramanifests directory to inject additional configurations—such as a MachineConfig manifest for creating the shared container partition.
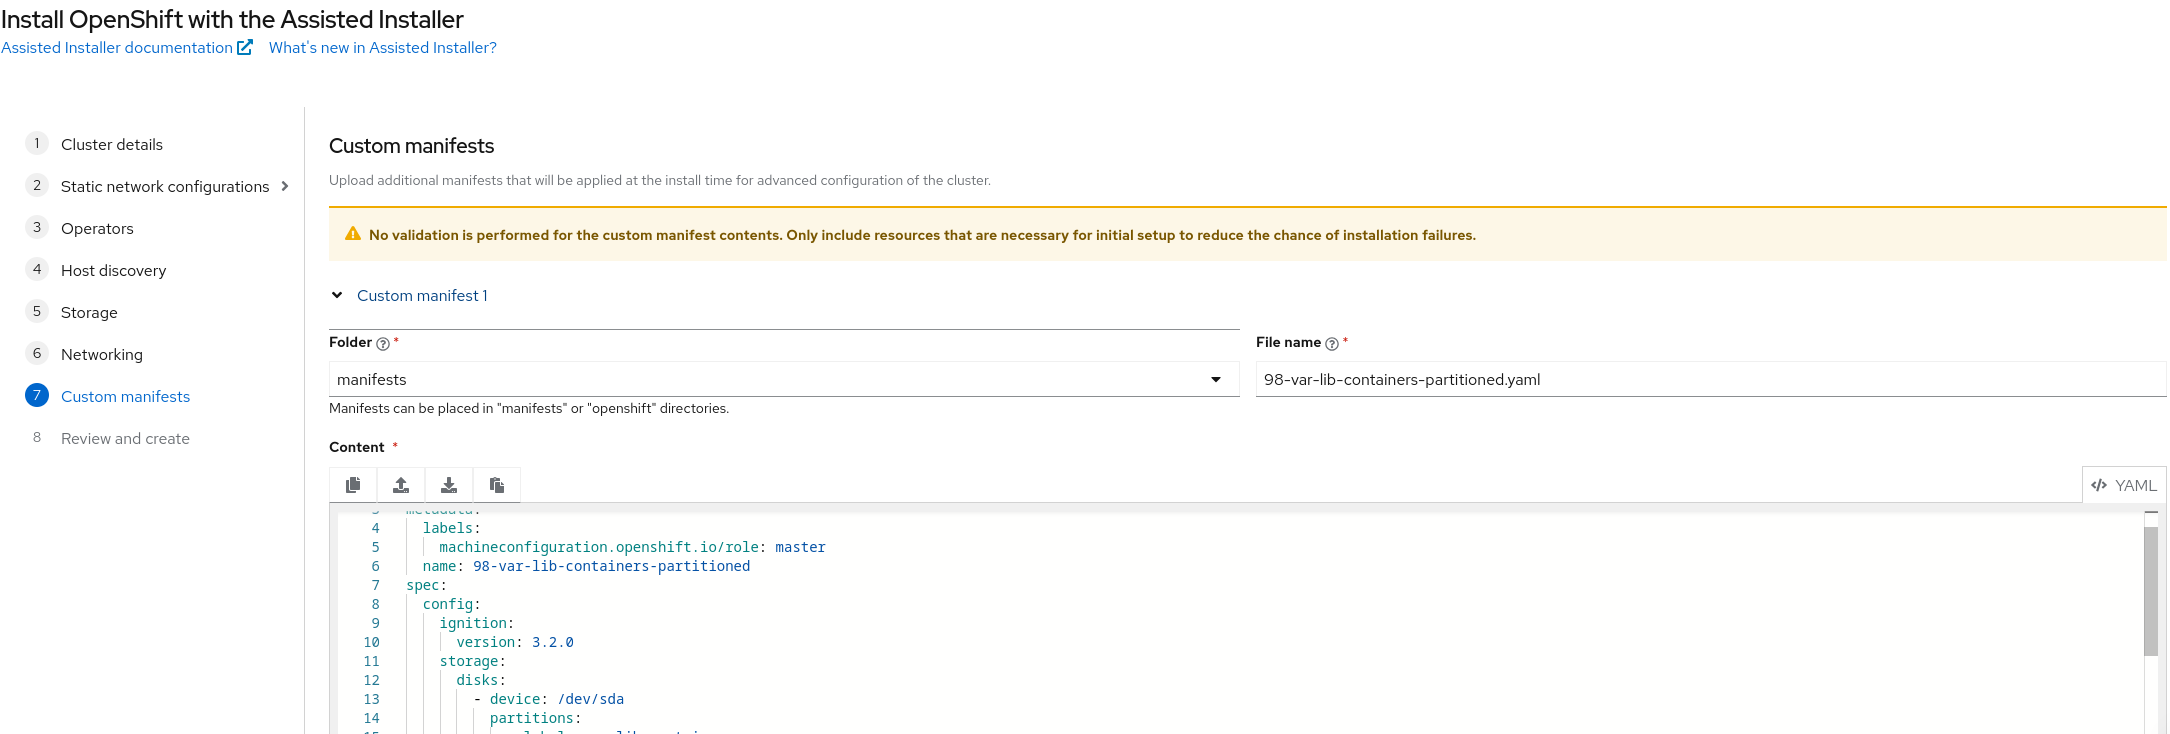
This allows us to ensure the disk layout meets the requirements for the seed image.
Configuratgion a shared contaienr partition
My seed server I allocated 1TB root disk,and plan is 500G for the shared contaienr partition.
Here’s an example MachineConfig that creates a partition at /var/lib/containers:
apiVersion: machineconfiguration.openshift.io/v1
kind: MachineConfig
metadata:
  labels:
    machineconfiguration.openshift.io/role: master
  name: 98-var-lib-containers-partitioned
spec:
  config:
    ignition:
      version: 3.2.0
    storage:
      disks:
        - device: /dev/sda
          partitions:
            - label: var-lib-containers
              startMiB:  204800
              sizeMiB: 512000
      filesystems:
        - device: /dev/disk/by-partlabel/var-lib-containers
          format: xfs
          mountOptions:
            - defaults
            - prjquota
          path: /var/lib/containers
          wipeFilesystem: true
    systemd:
      units:
        - contents: |-
            # Generated by Butane
            [Unit]
            Before=local-fs.target
            Requires=systemd-fsck@dev-disk-by\x2dpartlabel-var\x2dlib\x2dcontainers.service
            After=systemd-fsck@dev-disk-by\x2dpartlabel-var\x2dlib\x2dcontainers.service

            [Mount]
            Where=/var/lib/containers
            What=/dev/disk/by-partlabel/var-lib-containers
            Type=xfs
            Options=defaults,prjquota

            [Install]
            RequiredBy=local-fs.target
          enabled: true
          name: var-lib-containers.mount
To adapt this for your environment, you only need to change the partition section:
      disks:
        - device: /dev/sda
          partitions:
            - label: var-lib-containers
              startMiB: 204800
              sizeMiB: 512000
startMiB: This is the offset for the partition. When adding a data partition to the boot disk, a minimum offset of 25,000 MiB is generally recommended.
sizeMiB: Specify a minimum of 500 GB to ensure enough space for precached OpenShift container images.
After the installation completes, SSH into the node and verify the partition layout:
[core@api ~]$ lsblk
NAME   MAJ:MIN RM   SIZE RO TYPE MOUNTPOINTS
loop0    7:0    0   5.8M  1 loop
sda      8:0    0  1000G  0 disk
├─sda1   8:1    0     1M  0 part
├─sda2   8:2    0   127M  0 part
├─sda3   8:3    0   384M  0 part /boot
├─sda4   8:4    0  23.9G  0 part /var/lib/kubelet/pods/7577f6f9-2820-4aa7-a8a5-cf9792de5286/volume-subpaths/nginx-conf/networking-console-plugin/1
│                                /var
│                                /sysroot/ostree/deploy/rhcos/var
│                                /etc
│                                /sysroot
└─sda5   8:5    0   500G  0 part /var/lib/containers
sr0     11:0    1 124.5M  0 rom
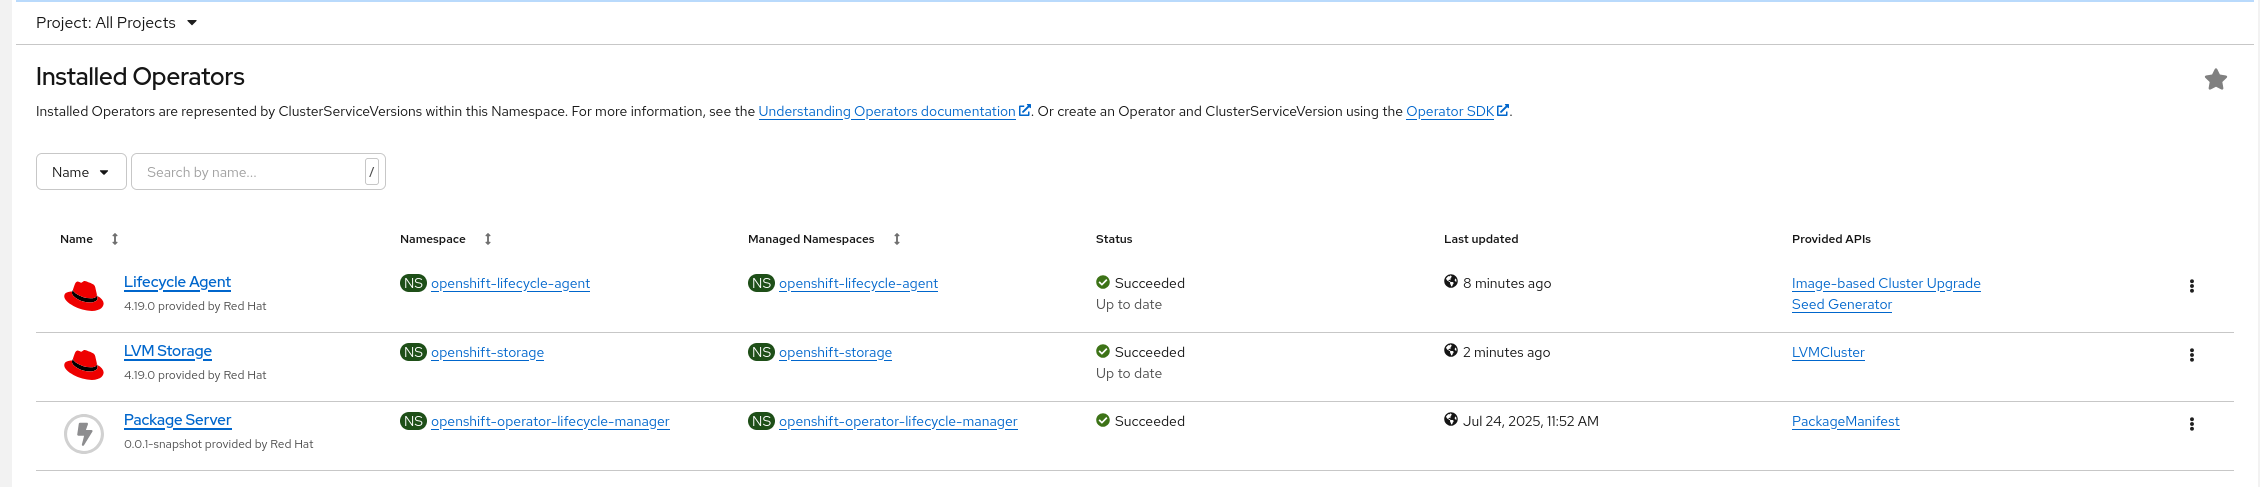
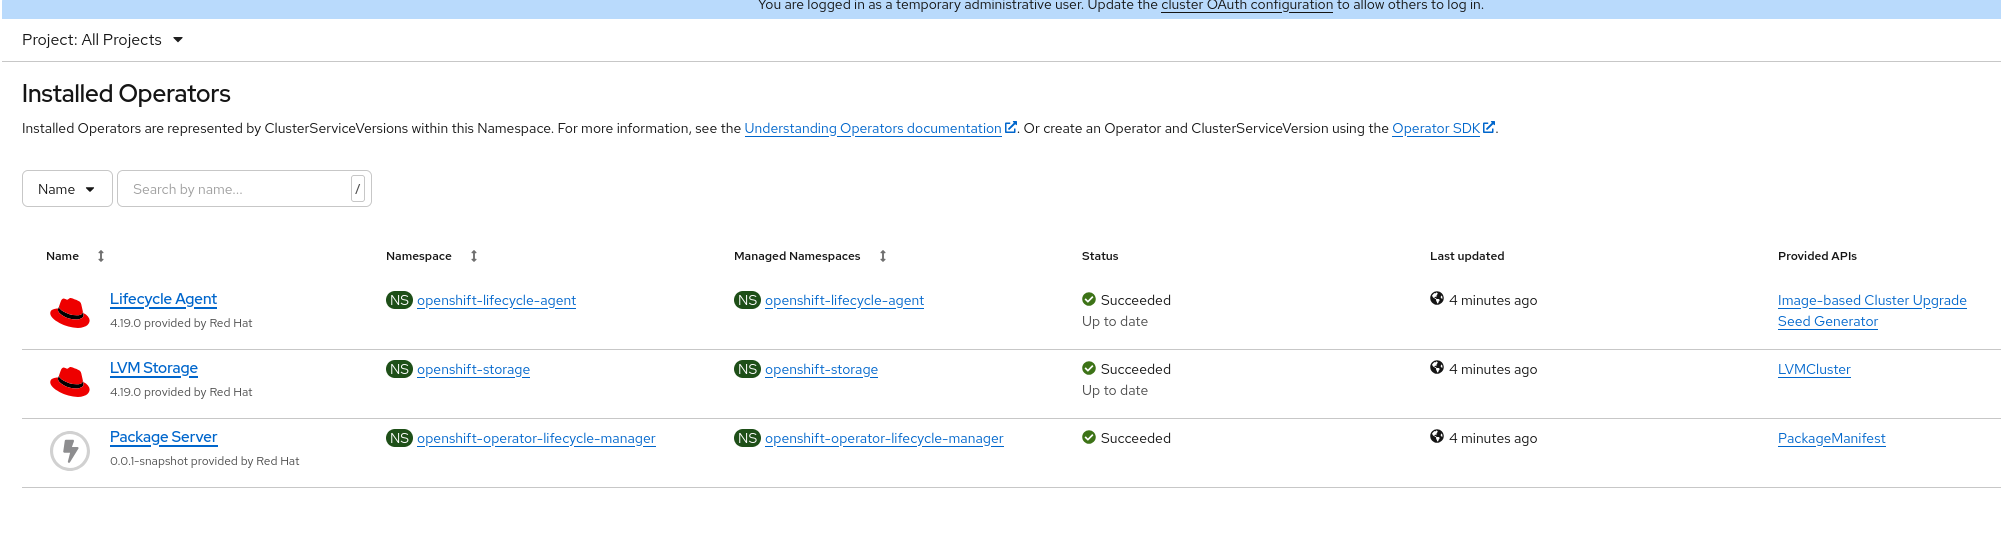
Lifecycle Agent Installation
Once the seed cluster is up and running, you can install the Lifecycle Agent either via the OperatorHub UI or by applying the necessary YAML manifests directly. In this tutorial, I also installed the LVM Storage Operator, but did not create the LVMCluster custom resource—only the operator itself is deployed at this stage. For details on which resources should be included in the seed image, please refer to the Seed Image Configuration Table.
Generating a Seed Image with the Lifecycle Agent
In this step, we’ll generate a seed image and push it to your image registry.
Note: All actions here are performed on the seed cluster.
First, create a pull secret that the Lifecycle Agent will use to authenticate with your image registry:
$ AUTHFILE=/tmp/my-auth.json
$ podman login --authfile ${AUTHFILE} -u ${MY_USER} quay.io/${MY_USER}
$ base64 -w 0 ${AUTHFILE} ; echo
Copy the base64-encoded output and paste it into the seedAuth field in the following Secret manifest:
apiVersion: v1
kind: Secret
metadata:
  name: seedgen
  namespace: openshift-lifecycle-agent
type: Opaque
data:
  seedAuth: <encoded_AUTHFILE>
Apply the secret to the seed cluster:
oc apply -f secret.yaml
Next, we’ll create a SeedGenerator custom resource (CR) to generate the seed image and push it to the specified container registry.
It’s recommended to use the format <seed_cluster_name>:<ocp_version> for the image tag to keep things consistent.
Here’s an example:
apiVersion: lca.openshift.io/v1
kind: SeedGenerator
metadata:
  name: seedimage
spec:
  seedImage: quay.io/zaphodbeeblebrox/seed-container-image:latest
Apply the CR to begin the image build:
oc apply -f seedgenerator.yaml
Note: During seed image generation, the seed cluster may temporarily lose API access while the Lifecycle Agent performs the operation.
Once the cluster recovers and the API becomes available again, check the status of the SeedGenerator:
$ oc get seedgenerators.lca.openshift.io
You should see output similar to:
NAME        AGE     STATE              DETAILS
seedimage   5m59s   SeedGenCompleted   Seed Generation completed
You can also verify that the image has been pushed to your container registry.

Preinstall SNO (Staging with installation ISO)
Now we’re ready to “cook” the SNO on the target host.
Download the openshift-install program that matches the version of OpenShift used in the seed image. It’s important that the versions are consistent.
The installer takes the seed image URL along with other inputs—such as the OpenShift release version and target installation disk—and generates a live installation ISO.
Boot the target host with this ISO to begin the preinstallation process. Once completed, the host will have all core OpenShift components staged and is ready to be shipped to the remote site for final configuration.
Creating the Installation ISO
Start by creating a working directory:
$ mkdir ibi-iso-workdir
Place your image-based-installation-config.yaml file inside this directory. Be sure to keep a backup copy, as the installer deletes this file after generating the ISO.
Here is an example configuration. In this setup, we define a shared container partition and an LVM storage partition (the latter was not present on the seed host):
In this example, we are creating a parition for LVM storage. (that was not in the seed host.)
#
# Note: This is a sample ImageBasedInstallationConfig file showing
# which fields are available to aid you in creating your
# own image-based-installation-config.yaml file.
#
apiVersion: v1beta1
kind: ImageBasedInstallationConfig
metadata:
  name: example-image-based-installation-config
# The following fields are required
seedImage: quay.io/zaphodbeeblebrox/seed-container-image:latest
seedVersion: 4.19.4
extraPartitionStart: "-500G"
installationDisk: /dev/sda
sshKey: '<SSH KEY>'
pullSecret: '<PULL SECRET>'
# networkConfig is optional and contains the network configuration for the host in NMState format.
# See https://nmstate.io/examples.html for examples.
networkConfig:
  interfaces:
    - name: enp1s0
      type: ethernet
      state: up
      mac-address: "52:54:00:6a:b8:7d"
      ipv4:
        enabled: true
        address:
          - ip: "192.168.1.70"
            prefix-length: 24
        dhcp: false
      ipv6:
        enabled: false
  dns-resolver:
      config:
        server:
          - "192.168.1.1"
  routes:
    config:
    - destination: "0.0.0.0/0"
      metric: 254
      next-hop-address: "192.168.1.1"
      next-hop-interface: enp1s0
skipDiskCleanup: true
coreosInstallerArgs:
   - "--save-partindex"
   - "6"
ignitionConfigOverride: |
  {
    "ignition": {
      "version": "3.2.0"
    },
    "storage": {
      "disks": [
        {
          "device": "/dev/sda",
          "partitions": [
            {
              "label": "storage",
              "number": 6,
              "sizeMiB": 0,
              "startMiB": 819200
            }
          ]
        }
      ]
    }
  }
⚠️ Note: The NIC name in networkConfig must match the actual interface name reported by the operating system.
Partition Layout Logic
In this example:
- extraPartitionStart: "-500G" reserves the final 500 GB of the disk for shared container storage.
- startMiB: 819200 (~800 GiB) offset defines the starting point for an additional LVM storage partition.
This results in:
- ~300 GB for the OpenShift root partition,
- 500 GB for the container partition (/var/lib/containers),
- Remaining ~200 GB used for LVM storage (manually defined here).
Let’s see how this layout plays out during installation.
Generating the Installation ISO
Once the configuration file is ready, generate the installation ISO using the following command:
$ ./openshift-install image-based create image --dir ibi-iso-workdir
Sample output:
INFO Adding NMConnection file <enp1s0.nmconnection>
INFO Consuming Image-based Installation ISO Config from target directory
INFO Creating Image-based Installation ISO with embedded ignition
After successful execution, the generated ISO file will appear in your working directory:
ibi-iso-workdir
└── rhcos-ibi.iso
Finish Preinstallation
Power on the target host using the installation ISO.
Once the system boots, log in and monitor the installation progress with system logs:
core@api ~]$ journalctl -f
Jul 24 19:43:25 api.ibi-managed-sno.cotton.blue install-rhcos-and-restore-seed.sh[1800]: time="2025-07-24 19:43:25" level=info msg="IBI preparation process finished successfully!"
Jul 24 19:43:25 api.ibi-managed-sno.cotton.blue systemd[1]: Finished SNO Image-based Installation.
Jul 24 19:43:25 api.ibi-managed-sno.cotton.blue systemd[1]: Reached target Multi-User System.
Jul 24 19:43:25 api.ibi-managed-sno.cotton.blue systemd[1]: Reached target Graphical Interface.
You can verify the partition layout to confirm the LVM partition is created as expected (e.g., /dev/sda6 with 200G):
core@api ~]$ lsblk
NAME   MAJ:MIN RM   SIZE RO TYPE MOUNTPOINTS
loop0    7:0    0   8.6G  0 loop /var
                                 /etc
                                 /run/ephemeral
loop1    7:1    0     1G  1 loop /usr
                                 /boot
                                 /
                                 /sysroot
sda      8:0    0  1000G  0 disk
├─sda1   8:1    0     1M  0 part
├─sda2   8:2    0   127M  0 part
├─sda3   8:3    0   384M  0 part /var/mnt/boot
├─sda4   8:4    0 299.5G  0 part /var/mnt
├─sda5   8:5    0   500G  0 part /var/lib/containers
└─sda6   8:6    0   200G  0 part
sr0     11:0    1   1.1G  0 rom  /run/media/iso
Manual Generation of Configuration ISO Using openshift-install
Before shipping the server to the remote site, the final step is to create a configuration ISO that carries site-specific details for the cluster setup.
Start by creating a working directory:
$ mkdir ibi-config-iso-workdir
Next, create two YAML files inside this directory:
- install-config.yaml: Defines core cluster settings
- image-based-config.yaml: Contains site-specific configurations for the node
Example install-config.yaml:
apiVersion: v1
metadata:
  name: ibi-managed-sno
baseDomain: cotton.blue
compute:
  - architecture: amd64
    hyperthreading: Enabled
    name: worker
    replicas: 0
controlPlane:
  architecture: amd64
  hyperthreading: Enabled
  name: master
  replicas: 1
networking:
  machineNetwork:
  - cidr: 192.168.1.0/24
platform:
  none: {}
fips: false
cpuPartitioningMode: "AllNodes"
pullSecret: '<PULL SECRET'
sshKey: '<SSH KEY'
Example image-based-config.yaml:
#
# Note: This is a sample ImageBasedConfig file showing
# which fields are available to aid you in creating your
# own image-based-config.yaml file.
#
apiVersion: v1beta1
kind: ImageBasedConfig
metadata:
  name: ibi-managed-sno-image-based-config
additionalNTPSources:
  - 0.rhel.pool.ntp.org
  - 1.rhel.pool.ntp.org
hostname: ibi-managed-sno
releaseRegistry: quay.io/zaphodbeeblebrox
# networkConfig contains the network configuration for the host in NMState format.
# See https://nmstate.io/examples.html for examples.
networkConfig:
  interfaces:
    - name: enp1s0
      type: ethernet
      state: up
      mac-address: "52:54:00:6a:b8:7d"
      ipv4:
        enabled: true
        address:
          - ip: "192.168.1.70"
            prefix-length: 24
        dhcp: false
      ipv6:
        enabled: false
  dns-resolver:
      config:
        server:
          - "192.168.1.1"
  routes:
    config:
    - destination: "0.0.0.0/0"
      metric: 254
      next-hop-address: "192.168.1.1"
      next-hop-interface: enp1s0
After placing these files in your working directory, run the following command to create the configuration ISO:
$./openshift-install image-based create config-image --dir ibi-config-iso-workdir/
Sample output:
INFO Adding NMConnection file <enp1s0.nmconnection>
INFO Consuming Install Config from target directory
INFO Consuming Install Config from target directory
INFO Consuming Image-based Config ISO configuration from target directory
INFO Config-Image created in: ibi-config-iso-workdir/auth
You can now ship the server to the remote site along with this configuration ISO.
Deploying SNO Cluster at the Remote Site
Now, imagine the server has been physically shipped to the remote site. The technician connects the necessary cables, inserts the configuration ISO, and powers on the server.
Once the server boots and completes the setup, you can verify the cluster status by checking the nodes:
$ oc get node
NAME              STATUS   ROLES                  AGE   VERSION
ibi-managed-sno   Ready    control-plane,master   61s   v1.32.6
In my environment, the OpenShift console becomes accessible within a few minutes. (I’m using a VM to emulate the server for testing.)
Additionally, the LVM Storage Operator is installed and available on the cluster, ready for use.
After creating the LVMCluster custom resource, the LVM operator initializes the storage on the reserved partition (/dev/sda6 in this case).
[core@ibi-managed-sno ~]$ lsblk
NAME                        MAJ:MIN RM   SIZE RO TYPE MOUNTPOINTS
loop0                         7:0    0   5.8M  1 loop
sda                           8:0    0  1000G  0 disk
├─sda1                        8:1    0     1M  0 part
├─sda2                        8:2    0   127M  0 part
├─sda3                        8:3    0   384M  0 part /boot
├─sda4                        8:4    0 299.5G  0 part /var/lib/kubelet/pods/048454c6-22bb-4158-9fd9-dc9ae9509e62/volume-subpaths/nginx-conf/networking-console-plugin/1
│                                                     /var
│                                                     /sysroot/ostree/deploy/rhcos_4.19.4/var
│                                                     /etc
│                                                     /sysroot
├─sda5                        8:5    0   500G  0 part /var/lib/containers
└─sda6                        8:6    0   200G  0 part
  ├─vg1-thin--pool--1_tmeta 253:0    0    92M  0 lvm
  │ └─vg1-thin--pool--1     253:2    0 179.8G  0 lvm
  └─vg1-thin--pool--1_tdata 253:1    0 179.8G  0 lvm
    └─vg1-thin--pool--1     253:2    0 179.8G  0 lvm
sr0                          11:0    1    64K  0 rom
Conclusion
In this tutorial, we walked through the preparation of the seed cluster, the pre-installation of the target host, and the final deployment using the IBI (Image-Based Installation) method with the openshift-install program.
While much of this process can be streamlined using tools like Red Hat Advanced Cluster Management (ACM) and GitOps, going through these manual steps has been valuable for building a deeper understanding—especially for troubleshooting purposes.
I hope you found it enjoyable and informative.
Thanks for reading!
Note:
Edited with the help of AI tools for clarity