
Deploying a Fortigate VNF with OpenShift Virtualization
Author: Brandon B. Jozsa
“Most people miss Opportunity because it is dressed in overalls and looks like work.”
- Thomas A. Edison
- Part I: Introduction
- Part II: Network Architecture
- Part III: Network Preparation and Manifests
- Verify NIC Compatibility
- Configure SR-IOV for OpenShift Virtualization
- Part IV: Preparation of the FortiGate Image
- Download the FortiOS QCOW2 Image
- Create and Upload the FortiOS Container Image
- Create Custom Configuration and License Secret for userData
- Summary and Requirements
- Part V: Deploying the FortiGate Firewall VM
- Description of the Virtual Machine Manifest
- Exploring KVM via OpenShift Virtualization
- Part VI: Closing Thoughts and Video Demonstration
Part I: Introduction
Did you hear that OpenShift can run virtual machines? If you haven't, it's time to introduce you to OpenShift Virtualization, and learn how you can leverage it for your existing VNF deployments. I created a companion video about this over on YouTube, but if you want some written instructions come back to this post.
- Network Architecture
- Network Preparation (Manifests)
a. SR-IOV Operator
b. SRIOV Network Node Policy (SRNNPM)
c. SRIOV Network Attachment Definition (NAD) - Preparation
a. Creating a Virtual Machine Registry Image
b. Creating Custom Configuration/License Secrets
Part II: Network Architecture
This is the part where I'm going to explain the goal, and how traffic will be used for the demonstration.
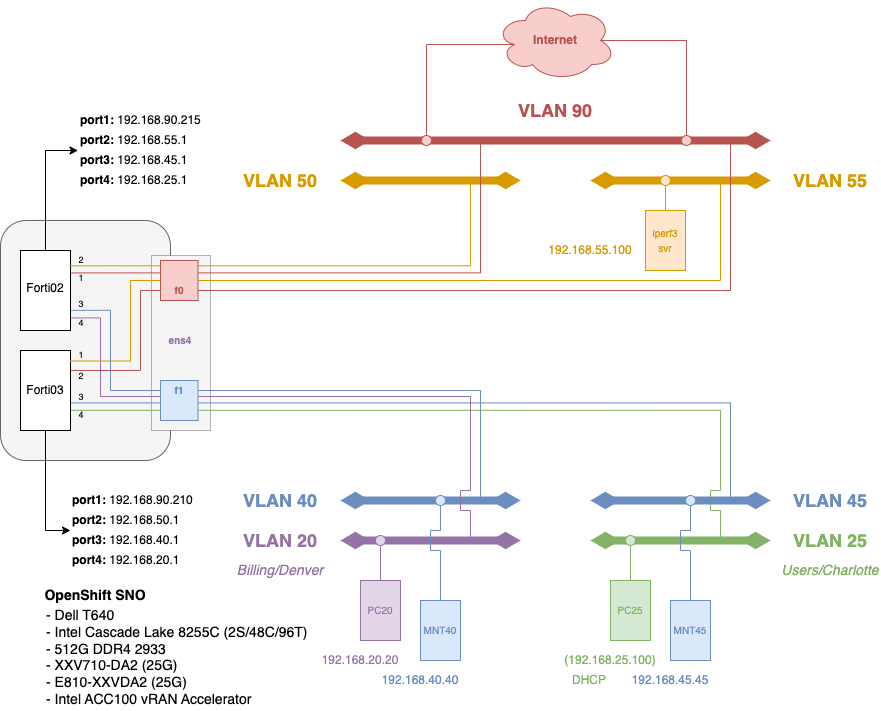
In Figure 1, there are two main VLANs to consider: VLAN 25, which is represented as a LAN in this case, and VLAN 55 which represents a DMZ. As any FortiGate firewall administrator knows, before any traffic passes through the firewall, the following basics must be in place:
- Interfaces: Interfaces for both VLAN 25 and 55 need to be configured with IP addresses/netmasks.
- DHCP: In this case with the LAN interface, I will be leveraging DHCP from the FortiGate firewall. So users/PC that are in VLAN 25 will obtain an IP address from a pool of
192.168.25.100-254/24, and a DNS server (in this case, we'll use a standard CloudFlare DNS server:1.1.1.1. - Firewall Rules: Firewall rules will need to be established for both the DMZ (VLAN 55) and LAN (VLAN 25) interfaces.
- SD-WAN: Although we won't actually fully support an SD-WAN (for the purposes of this demonstration), establishing this later can be somewhat problematic since firewall rules and anything else you apply directly can make an SD-WAN harder to implement later. So we're going to be considering this as part of our initial deployment requirements.
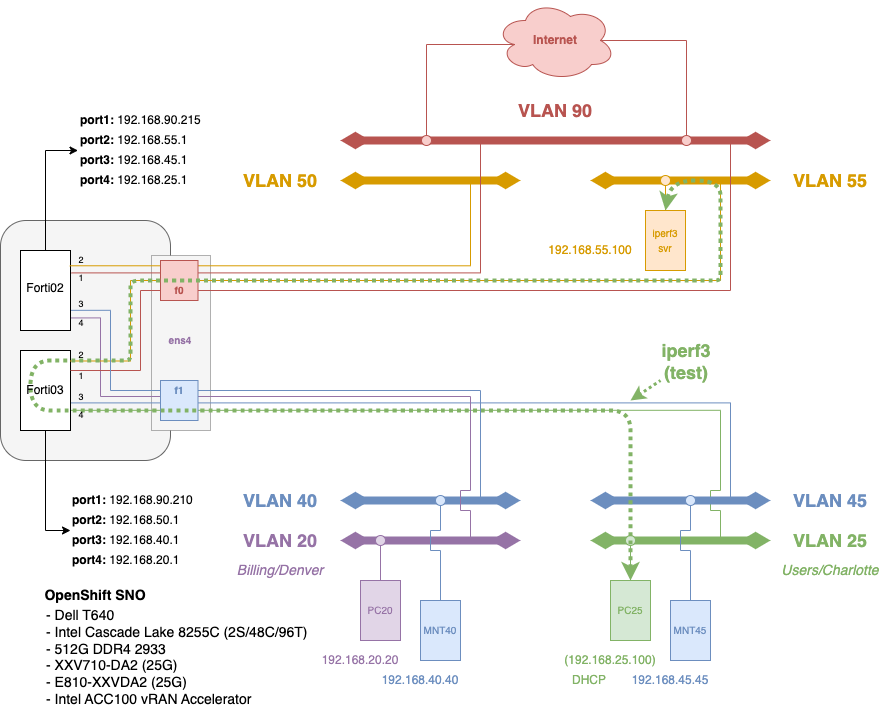
Figure 2 is going to show what I would like to demonstrate as part of this FortiGate deployment. Ultimately, I want more demonstrate greater than 10G of bandwidth to traverse through two interfaces: the "trusted" interface on ens4f1 and the "untrusted" interface on ens4f0. Each of the four (4) required interfaces used as part of the deployment will be taken from the VF pool as I described in the SR-IOV Configuration Guide I wrote about last week. Be sure to check this out (as I will be referencing this quite a bit).
Part III: Network Preparation and Manifests
Verify NIC Compatibility
The first step in preparing for a FortiGate firewall deployment on OpenShift is researching what network drivers are supported by both FortiOS 7.4.x and OpenShift 4.12.x. As an example, I really wanted to leverage the Intel E810-XXVDA2, however FortiOS doesn't support the Intel ice driver yet (understandably, if you understand the history for this NIC). So, after looking at the compatibility list between both FortiOS and OpenShift, I settled on the much more widely accepted Intel XXV710-DA2, which supports 25G with the i40e driver. Fortunately, this card/driver still supports DPDK (more on this in another post).
Configure SR-IOV for OpenShift Virtualization
Most of this small section has already been covered by the SR-IOV Configuration Guide that I posted about last week. I would suggest going to this post for details on configuring SR-IOV-based VFs for OpenShift Virtualization. The configuration manifests that were provided in that post are what was used for the FortiGate firewall deployment referenced in this blog post.
You will need to prepare and deploy three (3) primary things:
- The OpenShift SR-IOV Operator
- SR-IOV Network Node Policies
- SR-IOV Networks (Namespaced)
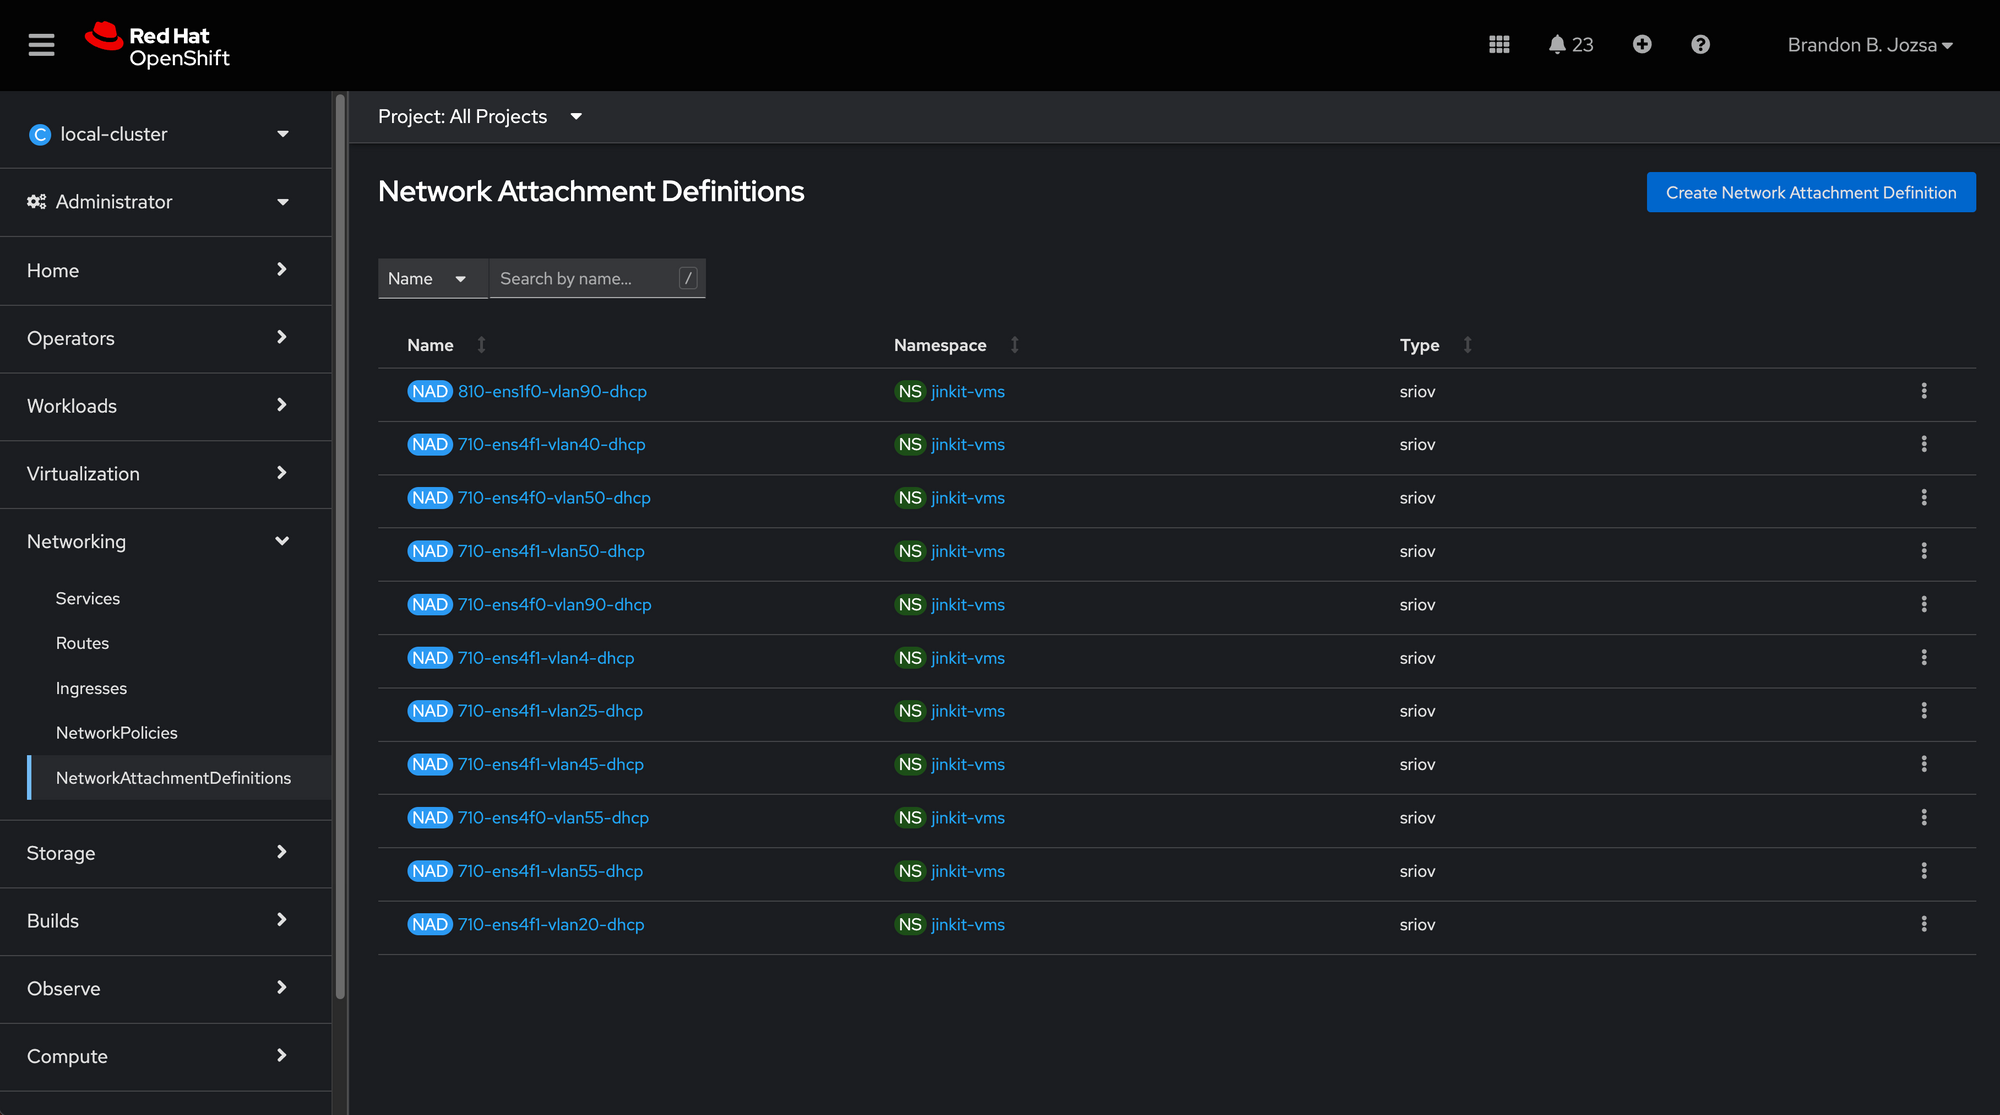
This will make Interface VFs configurable for your FortiGate VNF deployment (see Figure 3).
Part IV: Preparation of the FortiGate Image
This step is really crucial and fundamentally different from probably what you're used to when it comes to using an NFV platform like OpenStack. Let me first say, that I have been an OpenStack architect and developer for a really long time. I have created, what used to be, big tent projects within OpenStack. OpenShift Virtualization is what I really wanted when I first created the OpenStack-Helm project. OpenShift Virtualization is a lot better, for many reasons, but some are going to be touched on throughout this post.
Download the FortiOS QCOW2 Image
You read this correctly; we're going to create a container, which is really a scratch instance, and load it with the qcow2 image. I should say that this comes with a big assumption: that you've logged into Fortinet Support with your username/password, and have collected the FortiOS image (7.4.2 at the time of this writing) and license.lic file. Follow these steps to get going:
- Download the Virtual Machine from Fortinet Cloud. To do this, go to Support > Downloads > VM Images
- Select Product: FortiGate
- Select Platform: KVM
- Choose the latest version of the product: i.e. 7.2.4 (at the time of writing)
- Find the option for "New deployment of FortiGate for KVM" (i.e. search for
FGT_VM64_KVM-v7.2.4.F-build1396-FORTINET.out.kvm.zip) - Once fully downloaded, unzip the file (i.e.
fortios.qcow2)
Save this file in a working directly, because we're going to use it in the next section.
Save the "code" above and save this as a file called Dockerfile, and make sure it's in the same exact directory that fortios.qcow2 is located in.
Create and Upload the FortiOS Container Image
Now we're getting to the fun stuff, and what's fundamentally different than other virtual machine platforms: the QCOW2 can be uploaded directly to the UI within OpenShift Virtualization, but if you want to treat this more like a OpenShift/Kubernetes workload, than you want to build a container and upload this container for future use/reuse. We're going to do this in the following steps:
-
First, create a file called Dockerfile (should be obvious). This should be in the exact same directory as where you saved the fortios.qcow2 image from the steps earlier.
FROM scratch ADD --chown=107:107 fortios.qcow2 /disk/ -
Make sure that you have either Podman or another OCI-complaint container runtime available, run the following command (making the appropriate changes to make your registry):
podman build -t quay.io/bjozsa-redhat/fortios:v7.2.4 . -
Now you can push the container to your registry with the following command (making the appropriate changes to make your registry):
podman push quay.io/bjozsa-redhat/fortios:v7.2.4 -
Ensure that you can reach the registry and push images to (and pull from) it. Now, I'm going to say that this image shouldn't really be publically accessible. This means that you're going to need to create a secret that looks like the following:
apiVersion: v1 kind: Secret metadata: labels: app: containerized-data-importer # required name: quay-creds-registry-fortios # optional: name of the secret namespace: $NAMESPACE # optional: namespace where the vm are launched type: Opaque data: accessKeyId: "$REGISTRY_USERNAME" # optional: your key or user name, base64 encoded secretKey: "$REGISTRY_PASSWORD" # optional: your secret or password, base64 encoded -
Next deploy the secret to your OCP cluster:
oc create -f quay-creds-registry-fortios.yaml
Create Custom Configuration and License Secret for userData
FortiGate, like other enterprise firewall solutions, leverages Cloud-init for providing initial configuration for KVM instances. This is well documented on the FortiOS support page for KVM, but I'm going to provide a primer/example here to demonstrate how to use this with OpenShift Virtualization.
The cloud-init configuration is going to be provided as userData, provided in a MIME multi-part base64-encoded configuration file. We need two files to create this multi-part MIME file:
userData: This can be a FortiOS configuration or backup file - in FortiOS configuration format).license.lic: this file will be used to license the appliance VM.
If you want to use a backup file, you can (this is what I use for a demonstration on YouTube). If you want to use a sample file like the one below, this works as a baseline/test as well.
- Create a sample configuration file for the FortiOS VM. Name this file
cli-commands.txtspecifically:
Note: Pay close attention to IP addresses, interfaces, etc.config system interface edit "port1" set vdom "root" set mode static set ip 192.168.90.205/24 set allowaccess https ping ssh snmp http telnet fgfm radius-acct probe-response ftm next end config system dns set primary 192.168.3.5 set secondary 192.168.3.5 end config router static edit 2 set gateway 192.168.90.1 set device "port1" next end config system global set admintimeout 480 end - Save your
license.licfile in the same directory. Retain this filename oflicense.lic. - On a Linux system (I suggest RHEL or Fedora), install the following package. We're going to be installing this because we need a utility called
write-mime-multipart.sudo yum install cloud-utils -yy - Once that is installed, you will need to gather the following two files in order to generate the MIME-based userData cloud-init configuration file (change both files to match your license and configuation settings for FortiOS):
- license.lic
- cli-commands.txt
- Next, run the following command to generate the proper cloud-init userData file:
write-mime-multipart -o cloudinit.txt cli-commands.txt license.lic - Now, in the same directory, you will now have a file called cloudinit.txt. Use this resulting file to create a secret using this file with the following command:
oc create secret generic forticonfig-fortigate-test --from-file=userdata=cloudinit.txt
Summary and Requirements
To this point, you should have the following components ready (this is an overview):
- You've should have deployed the SR-IOV Operator as described in my previous SR-IOV blog post.
- You should've created an
SriovNetworkNodePolicyas described in my previous SR-IOV blog post. - You should've created an
SriovNetworkas described in my previous SR-IOV blog post. - You should've created a registry image with the
fortios.qcow2file as described above. - You should've created a registry secret that allows your Virtual Machines to grab the registry image (named
quay.io/bjozsa-redhat/fortios:v7.2.4). - You should've created downloaded the
license.licfile and created acli-command.txtfile, as described above. - You should've created multi-part MIME based userData file which was generated from the
license.licandcli-command.txtfiles, as described above (this should be calledcloudinit.txt, if you followed instructions). - From the
cloudinit.txtfile, you should've created a secret in the VM namespace, as described above.
Alright, now is the moment of truth! With all these components created and prepared, you are ready to deploy the FortiOS-based FortiGate firewall as a SR-IOV-based VNF on OpenShift Virtualization! Let's talk about the virtual machine manifests in the next section.
Part V: Deploying the FortiGate Firewall VM
We're approaching the final stretch. With all the preparations in place, it's time to deploy the virtual machine with the following manifest:
---
# Virtual Machine

apiVersion: kubevirt.io/v1
kind: VirtualMachine
metadata:
  name: fortios-02
spec:
  dataVolumeTemplates:
    - apiVersion: cdi.kubevirt.io/v1beta1
      kind: DataVolume
      metadata:
        creationTimestamp: null
        name: fortios-02
      spec:
        source:
          registry:
            secretRef: quay-creds-registry-fortios
            url: 'docker://quay.io/bjozsa-redhat/fortios:v7.2.4'
        storage:
          resources:
            requests:
              storage: 30Gi
  running: true
  template:
    metadata:
      labels:
        kubevirt.io/size: small
        kubevirt.io/domain: fortios-02
    spec:
      domain:
        cpu:
          cores: 8
        devices:
          disks:
            - name: rootdisk
              disk:
                bus: virtio
            - name: cloudinitconfig
              disk:
                disk: {}
          interfaces:
          - name: fortigate-test-02-port1
            macAddress: 02:9b:48:00:10:03
            model: virtio
            sriov: {}
          - name: fortigate-test-02-port2
            macAddress: 02:9b:48:00:10:04
            model: virtio
            sriov: {}
          - name: fortigate-test-02-port3
            macAddress: 02:9b:48:00:10:05
            model: virtio
            sriov: {}
          - name: fortigate-test-02-port4
            macAddress: 02:9b:48:00:10:44
            model: virtio
            sriov: {}
        resources:
          requests:
            memory: 16384M
      networks:
      - name: fortigate-test-02-port1
        multus:
          networkName: 710-ens4f0-vlan90-dhcp
      - name: fortigate-test-02-port2
        multus:
          networkName: 710-ens4f1-vlan50-dhcp
      - name: fortigate-test-02-port3
        multus:
          networkName: 710-ens4f1-vlan40-dhcp
      - name: fortigate-test-02-port4
        multus:
          networkName: 710-ens4f1-vlan20-dhcp
      volumes:
        - name: rootdisk
          dataVolume:
            name: fortios-02
        - name: cloudinitconfig
          cloudInitConfigDrive:
            secretRef:
              name: forticonfig-fortigate-sdwan-02
Let's talk about the really important parts of this YAML file. Whenever you want to know what's involved with creating a virtual machine manifest by hand, always remember to use oc explain (i.e. oc explain vm). I will be using oc explain vm for describing the parts of the file above. So if I say that something is located in a key of vm.spec.running, you can use oc explain vm.spec.running in order to better understand this field, and get the description of that key.
Description of the Virtual Machine Manifest
The first keys we're going to cover have to do with something familiar to you if you've used an NFV or Hypervisor before: system CPU, Memory, and Storage.
- CPU:
vm.spec.template.spec.domain.cpu - Memory:
vm.spec.template.spec.domain.resources.requests - Disk:
vm.spec.template.spec.domain.devices.disks - Network:
vm.spec.template.spec.domain.devices.interfaces
I'm going to take the opportunity to tell you to look each one of these up using the oc explain method I told you above. The reason why is, if you're used to running virtual machines on KVM, you might have realized that this is just running a KVM workload and this KVM-based workload just happens to be orchestrated via OpenShift Virtualization (or if you're using Kubernetes, then you're using Kubevirt). It's at this point, where a whole new world should be opened up to traditional NFV operators. Want to see more?
Exploring KVM via OpenShift Virtualization
Let's say you want to view the KVM XML manifest that OpenShift Virtualization is deploying - how can this be done? It's really pretty simple.
First, let's look at the pods in the same namespace where you deployed the virtual machine. If you're looking at the manifest examples used above, you will notice that my virtual machines are deployed to a project/namespace called jinkit-vms.
❯ oc get pods -n jinkit-vms
NAME                                    READY   STATUS    RESTARTS   AGE
virt-launcher-builder-kr6xh             1/1     Running   0          8d
virt-launcher-desktop-10-dnvrco-4mxp4   1/1     Running   0          7d5h
virt-launcher-desktop-20-dnvrco-hwk8l   1/1     Running   0          7d5h
virt-launcher-desktop-25-chrlnc-l9kwv   1/1     Running   0          7d5h
virt-launcher-desktop-55-chrlnc-bwqhz   1/1     Running   0          7d3h
virt-launcher-fedora-desktop-x59cw      1/1     Running   0          7d6h
virt-launcher-fortios-02-229nl          1/1     Running   0          6d
virt-launcher-fortios-03-kltbq          1/1     Running   0          6d
virt-launcher-pc20-wtms4                1/1     Running   0          7d23h
virt-launcher-pc25-9nlbr                1/1     Running   0          7d22h
virt-launcher-tnsr01-kkbrj              1/1     Running   0          8d
I also deployed a FortiGate VM called fortios-02. Looking at the oc get pods output above, you can see that there are several pods with the prefix of virt-launcher. Let's explore this a little more with some tools you may be more familiar with:
❯ oc rsh virt-launcher-fortios-02-229nl virsh list
Authorization not available. Check if polkit service is running or see debug message for more information.
 Id   Name                    State
---------------------------------------
 1    jinkit-vms_fortios-02   running
From this we can tell that there's a 1-to-1 mapping between a virtual machine, and the prefixed virt-launcher pod. If you were to explore the logs of this virt-launcher pod, you would see that this is used to set up/manage the virtual machine for fortios-02. This also means that you can dump the xml of this virtual machine with the following command:
❯ oc rsh virt-launcher-fortios-02-229nl virsh dumpxml 1
Authorization not available. Check if polkit service is running or see debug message for more information.
<domain type='kvm' id='1'>
  <name>jinkit-vms_fortios-02</name>
  <uuid>4f0c2bc4-26ba-5935-b3d4-7e0b76596916</uuid>
  <metadata>
    <kubevirt xmlns="http://kubevirt.io">
      <uid>902924c1-0c98-4411-81bf-adefb3050923</uid>
      <graceperiod>
        <deletionGracePeriodSeconds>30</deletionGracePeriodSeconds>
      </graceperiod>
    </kubevirt>
  </metadata>
  <memory unit='KiB'>16000000</memory>
  <currentMemory unit='KiB'>16000000</currentMemory>
  <vcpu placement='static'>8</vcpu>
  <iothreads>1</iothreads>
  <sysinfo type='smbios'>
    <system>
      <entry name='manufacturer'>Red Hat</entry>
      <entry name='product'>OpenShift Virtualization</entry>
      <entry name='version'>4.12.3</entry>
      <entry name='uuid'>4f0c2bc4-26ba-5935-b3d4-7e0b76596916</entry>
      <entry name='sku'>4.12.3</entry>
      <entry name='family'>Red Hat</entry>
    </system>
  </sysinfo>
  <os>
    <type arch='x86_64' machine='pc-q35-rhel8.6.0'>hvm</type>
    <boot dev='hd'/>
    <smbios mode='sysinfo'/>
  </os>
...
...
... more (redacted)
Part VI: Closing Thoughts and Video Demonstration
So I'm curious about what you can deploy using OpenShift Virtualization. There's a lot of work being done in the background to make OpenShift Virtualization work for everyone one, and this includes enterprise VNF workloads such as high performance firewalls and other networking vm-based appliances. I have some more blogs and content that I'll be creating in the following weeks, while I have licenses for these partner solutions. I'd love to hear what you think, so reach me over at Twitter or give me a thumbs-up on YouTube. I'd enjoy your feedback as I work with our ecosystem teams and other partners that support our Telco Media and Entertainment customers.