OpenShift Data Foundation on Single Node OpenShift (SNO)
Author: Brandon B. Jozsa, Dylan Wong
"When 'I' replaced with 'We', even illness becomes wellness."
- Malcolm X
- Part I: Introduction
- Part II: Requirements and Preparation
- Part III: Operator Installation
- Part IV: Tuning ODF Resources for SNO Environments
- Part V: Creating ODF StorageClasses
- Part VI: RADOS Gateway S3 Route
- Part VII: Custom Grafana Dashboards
- Part VIII: Removal
- Part IX: Testing
- Final Thoughts
- TODO
Part I: Introduction
We write about OpenShift Single Node OpenShift (SNO) deployments on this blog quite a bit. That's because our team is always trying to balance what we have available in our home labs, with what we need to demonstrate, both functionality and from a future scalability standpoint, for the customers we work with each day.
One question recently came up: "Can [we] run OpenShift Data Foundation on a SNO deployment?" OpenShift Data Foundation is heavily tested and supported directly from Red Hat. Red Hat also makes development pipelines and release gates available to partners, so that they can test and deploy their own workloads during a collaborative certification process. The only issue, is that sometimes customers would like to demonstrate or test deployments on their own, prior to their larger scale rollouts. Additionally, as they work with other groups internally, they want something that's just easy to deploy and use. Sometimes they're trying to convince other teams to move to Kubernetes/OpenShift-based workloads, and they just want others to have an opportunity to test and learn the platform. Lastly, customers also like the option to test small, fail fast, rinse and repeat in an ephemeral non-production environment, so they can simply learn the product. This mindset has only come up more recently with what is happening with OpenShift Virtualization (given a certain recent acquisition).
So the answer to the question, "Can [we] run OpenShift Data Foundation on a SNO deployment?" Yes! You certainly can. So let's get started with today's demonstration.
Part II: Requirements and Preparation
Requirements
I won't bury the lead here; you must have at least 3 physical disks or disk partitions to leverage this solution.
- 1 disk is required for the installation (where SNO is deployed to)
- 2 disks or disk partitions will be required for ODF consumption
As for supportability of this solution; be sure to contact your account representative for questions regarding support, because we'd like to hear your use cases and promote your overall objectives to our product teams. As of now, this solution should be limited to lab use and testing only, however with enough interest, our product teams may be able to make things happen (which is generally how product teams work).
Preparation
With your KUBECONFIG variable set and trusty (hopefully updated) oc command ready, have a look around at your environment.
❯ export KUBECONFIG=$HOME/.kube/config

❯ echo $KUBECONFIG
/Users/bjozsa/.kube/config
TIP: Just a reminder, you can easily export your KUBECONFIG assuming oc is configured and logged into your cluster. From there, you can echo the variable to verify.
❯ SNO_NAME=$(oc get no -o name)

❯ oc get $SNO_NAME
NAME       STATUS   ROLES                         AGE   VERSION
roderika   Ready    control-plane,master,worker   21d   v1.28.11+add48d0
In my SNO environment, I have named my endpoint named roderika. Using this node name, let's connect to the host and take a look around at the attached disks. We're looking for reasonable candidates for OpenShift Storage disks. You can run the following lsblk command on the CLI to show your attached disks.
cat <<EOF | oc debug $SNO_NAME
chroot /host
lsblk -d -o name,rota,size,type
EOF
The output should look similar to the following. Keep track of the attached disks (or partitions) names that you want to leverage for ODF. I will be using sdb and sdc in the examples throughout the rest of this guide.
Starting pod/roderika-debug-r6kx5 ...
To use host binaries, run `chroot /host`
Pod IP: 192.168.3.99
If you don't see a command prompt, try pressing enter.
sh: cannot set terminal process group (51114): Inappropriate ioctl for device
sh: no job control in this shell
sh-5.1# lsblk -d -o name,rota,size,type
sh-5.1# exit
NAME ROTA  SIZE TYPE
sda     1  931G disk
sdb     1  7.3T disk
sdc     1  5.5T disk
sdd     1  3.6T disk
sde     1  931G disk
sr0     1 1024M rom

Removing debug pod ...
While the previous lsblk command provided some pretty useful information, let's try again so we can get the disk size as OpenShift or Kubernetes would like it declared in a PersistentVolume. One trick you can try, is to use some CLI-foo on against the lsblk output to get some additional details that can be used later on - specifically the size disks in G (similar to the SIZE="7448G" in the example below). To get this information, try the following command.
cat <<EOF | oc debug node/roderika
chroot /host
lsblk -bo +UUID,NAME -P | awk '\$1 {\$4=sprintf("SIZE=\"%.0fG\"", substr(\$4,7,length(\$4)-7)/1024**3); print}'
EOF
Record this information for use in further instructions below. The two items you really need are the NAME (which you already have) and the SIZE as it's listed in the example below. Record these items, both the name and it's relative size in G.
NAME="sda" MAJ_MIN="8:0" RM="0" SIZE="931G" RO="0" TYPE="disk" MOUNTPOINTS="" UUID="" NAME="sda"
NAME="sda1" MAJ_MIN="8:1" RM="0" SIZE="0G" RO="0" TYPE="part" MOUNTPOINTS="" UUID="" NAME="sda1"
NAME="sda2" MAJ_MIN="8:2" RM="0" SIZE="0G" RO="0" TYPE="part" MOUNTPOINTS="" UUID="8982-B51A" NAME="sda2"
NAME="sda3" MAJ_MIN="8:3" RM="0" SIZE="0G" RO="0" TYPE="part" MOUNTPOINTS="/boot" UUID="940afb0a-25e5-4120-a3b9-a6b5d4c12dba" NAME="sda3"
NAME="sda4" MAJ_MIN="8:4" RM="0" SIZE="930G" RO="0" TYPE="part" MOUNTPOINTS="/var/lib/kubelet/pods/847fcfca-4f61-46b0-b681-18ef907d74d3/volume-subpaths/nginx-conf/nmstate-console-plugin/1\x0a/var/lib/kubelet/pods/6c857302-50ef-4cfb-8d89-967553e9e73e/volume-subpaths/nginx-conf/monitoring-plugin/1\x0a/var\x0a/sysroot/ostree/deploy/rhcos/var\x0a/sysroot\x0a/usr\x0a/etc\x0a/" UUID="c33de4be-8114-4985-a277-d21ba213a415" NAME="sda4"
NAME="sdb" MAJ_MIN="8:16" RM="0" SIZE="7448G" RO="0" TYPE="disk" MOUNTPOINTS="" UUID="" NAME="sdb"
NAME="sdc" MAJ_MIN="8:32" RM="0" SIZE="5588G" RO="0" TYPE="disk" MOUNTPOINTS="" UUID="" NAME="sdc"
NAME="sdd" MAJ_MIN="8:48" RM="0" SIZE="3726G" RO="0" TYPE="disk" MOUNTPOINTS="" UUID="" NAME="sdd"
NAME="sde" MAJ_MIN="8:64" RM="0" SIZE="931G" RO="0" TYPE="disk" MOUNTPOINTS="" UUID="" NAME="sde"
NAME="sr0" MAJ_MIN="11:0" RM="1" SIZE="1G" RO="0" TYPE="rom" MOUNTPOINTS="" UUID="" NAME="sr0"
sh-5.1# exit

Removing debug pod ...
S in summary, we should have the following information (below), which we'll use for the ODF on SNO installation.
- Disks or partitions we will be using for ODF
/dev/sdb/dev/sdc
- Size of the disks in
G7448Gfor/dev/sdb5588Gfor/dev/sdc
Part III: Operator Installation
With the prerequisites now fully understood and out of the way, we can begin our installation.
-
First, label the node with the standard label used for OpenShift Storage/OpenShift Data Foundation.
oc label "$(oc get no -o name)" \ cluster.ocs.openshift.io/openshift-storage='' --overwrite -
Create the following namespace, which is standard for OpenShift Storage/OpenShift Data Foundation, and then change into that project.
oc create ns openshift-storage
oc project openshift-storage
TIP: As a really useful sidenote and in case you weren't already aware of this, the
occommand won't let you create a project that starts withopenshift-*because it is considered a "protected namespace". This is why we opted to create a namespace rather than a project in the command above. -
Now we're going to create an
OperatorGroupandCatalogSource.oc apply -f - <<EOF apiVersion: operators.coreos.com/v1alpha2 kind: OperatorGroup metadata: name: openshift-storage-operatorgroup namespace: openshift-storage spec: targetNamespaces: - openshift-storage --- apiVersion: operators.coreos.com/v1alpha1 kind: CatalogSource metadata: name: ocs-catalogsource namespace: openshift-marketplace spec: sourceType: grpc image: quay.io/mulbc/ocs-operator-index:katacoda-46 displayName: OpenShift Container Storage publisher: Red Hat EOF -
Now you can create a
Subscriptionwith the following command. Once this object is applied, you'll notice several operator pods deploy to the cluster. If you want to watch these pods spin up in real-time, I would recommend either watching the Operator > Installed Operators panel, or the Workloads > Pods panel (filtered for theopenshift-storagenamespace) as theSubscriptionobject is deployed from the CLI.cat <<EOF | oc create -f - apiVersion: operators.coreos.com/v1alpha1 kind: Subscription metadata: name: ocs-subscription namespace: openshift-storage spec: channel: alpha name: ocs-operator source: ocs-catalogsource sourceNamespace: openshift-marketplace EOF -
You will need to wait until the operator is successfully installed before continuing to the next step. If you're watching the Operator > Installed Operators in the web console, you will see the operator work through the various installation phases, but I would recommend using the following command which is a bit more automation-friendly.
while [ "$(oc get csv -n openshift-storage | grep -e ocs-operator | grep -c Succeeded)" -lt 1 ]; do echo -n "."; sleep 5; done; echo -n "Ready\!" -
Create a
StorageClassand correspondingPersistentVolumeobjects. We collected the relevant information earlier (like diskNAMEandSIZE. Now we want to use these values when creating a correspondingPersistentVolume. In our examples, we're using disks/dev/sdb(which is7448G) and/dev/sdc(which is5588G`), but let's make this easier by mapping them to some useful variables.NAME_DISK_01="sdb" NAME_DISK_02="sdc" SIZE_DISK_01="7448G" SIZE_DISK_02="5588G"Now you can use these variable definitions to create the following
PersistentVolumes, one for each disk (for a total of 2pv). You do not need to make any edits to the manifests below.cat <<EOF | oc create -f - --- kind: StorageClass apiVersion: storage.k8s.io/v1 metadata: name: localblock provisioner: kubernetes.io/no-provisioner --- apiVersion: v1 kind: PersistentVolume metadata: name: local-pv-"$NAME_DISK_01" spec: capacity: storage: "$SIZE_DISK_01" volumeMode: Block accessModes: - ReadWriteOnce persistentVolumeReclaimPolicy: Delete storageClassName: localblock local: path: /dev/"$NAME_DISK_01" nodeAffinity: required: nodeSelectorTerms: - matchExpressions: - key: node.openshift.io/os_id operator: In values: - rhcos --- apiVersion: v1 kind: PersistentVolume metadata: name: local-pv-"$NAME_DISK_02" spec: capacity: storage: "$SIZE_DISK_02" volumeMode: Block accessModes: - ReadWriteOnce persistentVolumeReclaimPolicy: Delete storageClassName: localblock local: path: /dev/"$NAME_DISK_02" nodeAffinity: required: nodeSelectorTerms: - matchExpressions: - key: node.openshift.io/os_id operator: In values: - rhcos EOF -
Next you will want to apply a custom
ConfigMapwhich restricts the resources consumed by the Rook/Ceph resources. This will make it easier to run on a SNO environment, and these values will consume less resources overall.cat <<EOF | oc create -f - apiVersion: v1 kind: ConfigMap metadata: name: rook-config-override namespace: openshift-storage data: config: |2 [global] mon_osd_full_ratio = .85 mon_osd_backfillfull_ratio = .80 mon_osd_nearfull_ratio = .75 mon_max_pg_per_osd = 600 osd_pool_default_min_size = 1 osd_pool_default_size = 2 [osd] osd_memory_target_cgroup_limit_ratio = 0.5 EOF -
This next step is where the operator deployment really takes off. To this point, you might have noticed that there hasn't been a lot of activity to this point, especially if you've worked wtih ODF before and know how many pods/workloads can be deployed with a typical installation. The following YAML will deploy ODF/OpenShift Storage. In the next section, we will begin to customize the deployment and create the various
StorageClassobjects that our workloads can leverage.cat <<EOF | oc create -f - apiVersion: ocs.openshift.io/v1 kind: StorageCluster metadata: name: ocs-storagecluster namespace: openshift-storage spec: resources: mon: limits: cpu: 500m memory: 512Mi requests: cpu: 125m memory: 128Mi mds: limits: cpu: 500m memory: 512Mi requests: cpu: 125m memory: 128Mi mgr: limits: cpu: 500m memory: 512Mi requests: cpu: 125m memory: 128Mi rgw: limits: cpu: 500m memory: 512Mi requests: cpu: 125m memory: 128Mi managedResources: cephConfig: reconcileStrategy: ignore cephBlockPools: reconcileStrategy: ignore cephFilesystems: reconcileStrategy: ignore cephObjectStoreUsers: reconcileStrategy: ignore cephObjectStores: reconcileStrategy: ignore snapshotClasses: reconcileStrategy: manage storageClasses: reconcileStrategy: manage multiCloudGateway: reconcileStrategy: ignore manageNodes: false monDataDirHostPath: /var/lib/rook storageDeviceSets: - count: 2 dataPVCTemplate: spec: accessModes: - ReadWriteOnce resources: requests: storage: 1 storageClassName: localblock volumeMode: Block name: ocs-deviceset placement: {} portable: false replica: 1 EOFNOTE: To view workloads as they come up, run the following
watchcommand.watch oc get pods -n openshift-storageThis is how it should look when things are completed successfully
NAME                                                       READY   STATUS      RESTARTS   AGE
csi-cephfsplugin-provisioner-5468b8c5f7-b4rfg              6/6     Running     0          2m31s
csi-cephfsplugin-v5ncf                                     3/3     Running     0          2m31s
csi-rbdplugin-h7gf5                                        3/3     Running     0          2m32s
csi-rbdplugin-provisioner-5d985bccd4-cqqb2                 6/6     Running     0          2m32s
noobaa-operator-694f6f5448-t9wqj                           1/1     Running     0          96m
ocs-metrics-exporter-6d46cb97c6-w2qcj                      1/1     Running     0          96m
ocs-operator-c984ddc76-c6r68                               1/1     Running     0          96m
rook-ceph-crashcollector-roderika-6bbcd57958-vvtjh         1/1     Running     0          2m22s
rook-ceph-mgr-a-84568fd787-lw5ps                           1/1     Running     0          2m14s
rook-ceph-mon-a-594df44b6f-pwsp6                           1/1     Running     0          2m26s
rook-ceph-operator-789cd8599f-xclhb                        1/1     Running     0          96m
rook-ceph-osd-0-7db7f77c6f-wrgts                           1/1     Running     0          113s
rook-ceph-osd-prepare-ocs-deviceset-0-data-0-z62j9-xckh8   0/1     Completed   0          2m13s
rook-ceph-osd-prepare-ocs-deviceset-0-data-1-bjmht-lbg2k   0/1     Completed   0          2m13s
With this section complete, you should have an installed operator and StorageCluster. But we still need to tune these settings for ODF, and once the tuning configurations have been applied, we will need to create the StorageClass objects, which is required for workloads. Let's continue these steps in the following sections.
Part IV: Tuning ODF Resources for SNO Environments
With the operator and StorageCluster in stalled, we really need to tune the Ceph/Rook resources for a resource constrained SNO environment. Once the tuning is complete, we will then create some associated StorageClass objects in the folloiwng section.
One thing I'll say upfront is that these are some basic settings overrides. These are not intended to be an exact science for a specific use case. That said, I'll show you some usable settings for SNO, and then provide you some documents and other resources (like chat grounds, etc) where you can do some additional tuning for your specific scenario. I would suggest familiarizing yourself with Ceph's documentation for some tuning options, as well as Rook's documentation for some addititional information. Of course and as always, I'll also suggest that you check with Red Hat's OpenShift Data Foundation's documentation, which is extremely thorough as well.
With all that out of the way, let's get started with the tuning section!
-
So first, we want to add the
rook-ceph-toolsutility to our ceph deployment so that we can issueceph configtuning commands for each of the deployments we wish to modify. Use the following command to deploy this pod.oc patch OCSInitialization ocsinit -n openshift-storage --type json --patch '[{ "op": "replace", "path": "/spec/enableCephTools", "value": true }]' oc wait --for=condition=Ready --timeout=10m pod -l app=rook-ceph-tools export POD=$(oc get po -l app=rook-ceph-tools -o name) -
With the
rook-ceph-toolspod deploymented, we're going to tune theosd_pool_default_sizeto a value of2.rookoperator=$(oc get pods -n openshift-storage -o name --field-selector='status.phase=Running' | grep 'rook-ceph-operator') oc rsh -n openshift-storage ${rookoperator} ceph -c /var/lib/rook/openshift-storage/openshift-storage.config config set global osd_pool_default_size 2NOTE: You can see this value set in the config, if you run the following command.
oc rsh -n openshift-storage ${rookoperator} ceph -c /var/lib/rook/openshift-storage/openshift-storage.config config get osd -
Next, create the following
CephBlockPoolobject.cat <<EOF | oc apply -f - apiVersion: ceph.rook.io/v1 kind: CephBlockPool metadata: name: ocs-storagecluster-cephblockpool namespace: openshift-storage spec: compressionMode: "" crushRoot: "" deviceClass: "" enableRBDStats: true erasureCoded: algorithm: "" codingChunks: 0 dataChunks: 0 failureDomain: osd replicated: requireSafeReplicaSize: false size: 2 EOF -
Now create a
CephFilesystemobject.cat <<EOF | oc apply -f - apiVersion: ceph.rook.io/v1 kind: CephFilesystem metadata: name: ocs-storagecluster-cephfilesystem namespace: openshift-storage spec: dataPools: - compressionMode: "" crushRoot: "" deviceClass: "" enableRBDStats: false erasureCoded: algorithm: "" codingChunks: 0 dataChunks: 0 failureDomain: osd replicated: requireSafeReplicaSize: false size: 2 metadataPool: compressionMode: "" crushRoot: "" deviceClass: "" enableRBDStats: false erasureCoded: algorithm: "" codingChunks: 0 dataChunks: 0 failureDomain: osd replicated: requireSafeReplicaSize: false size: 2 metadataServer: activeCount: 1 activeStandby: false resources: limits: cpu: "1" memory: 1Gi requests: cpu: "500m" memory: 256Mi preservePoolsOnDelete: false EOF -
We need to scale down the CephFS MDS replicas with this next series of commands. There are
2separate objects that need scaled down to0.secondmdsreplicaset=$(oc get replicaset -o name | grep mds | grep 'cephfilesystem-b') oc scale ${secondmdsreplicaset} -n openshift-storage --replicas=0 secondmds=$(oc get deployment -o name -n openshift-storage | grep mds | grep 'cephfilesystem-b') oc scale ${secondmds} -n openshift-storage --replicas=0 -
Now we're going to reset any alarms or warnings before continuing on. NOTICE: there's a variable
rookoperatorbeing used below. This value is coming from earlier in Step 2. I've repeated this variable in order to make the guide easier to follow.rookoperator=$(oc get pods -n openshift-storage -o name --field-selector='status.phase=Running' | grep 'rook-ceph-operator') oc rsh -n openshift-storage ${rookoperator} ceph -c /var/lib/rook/openshift-storage/openshift-storage.config fs set ocs-storagecluster-cephfilesystem standby_count_wanted 0NOTE: You can see these values set in the config, if you run the following command.
oc rsh -n openshift-storage ${rookoperator} ceph -c /var/lib/rook/openshift-storage/openshift-storage.config fs dump -
Now let's set some reasonable metrics for the OSD pool.
oc rsh -n openshift-storage ${rookoperator} ceph -c /var/lib/rook/openshift-storage/openshift-storage.config osd pool set device_health_metrics size 2 oc rsh -n openshift-storage ${rookoperator} ceph -c /var/lib/rook/openshift-storage/openshift-storage.config osd pool set device_health_metrics min_size 1 oc rsh -n openshift-storage ${rookoperator} ceph -c /var/lib/rook/openshift-storage/openshift-storage.config osd pool set device_health_metrics pg_num 8 oc rsh -n openshift-storage ${rookoperator} ceph -c /var/lib/rook/openshift-storage/openshift-storage.config osd pool set device_health_metrics pgp_num 8 -
Lastly, let's create a
CephObjectStoreobject.cat <<EOF | oc create -f - apiVersion: ceph.rook.io/v1 kind: CephObjectStore metadata: name: ocs-storagecluster-cephobjectstore namespace: openshift-storage spec: dataPool: crushRoot: "" deviceClass: "" erasureCoded: algorithm: "" codingChunks: 0 dataChunks: 0 failureDomain: osd replicated: requireSafeReplicaSize: false size: 2 gateway: allNodes: false instances: 1 placement: {} port: 80 resources: {} securePort: 0 sslCertificateRef: "" metadataPool: crushRoot: "" deviceClass: "" erasureCoded: algorithm: "" codingChunks: 0 dataChunks: 0 failureDomain: osd replicated: size: 2 requireSafeReplicaSize: false EOF
That's the last of the objects and configuration modifications that we need to make. Now let's create the StorageClass objects, which our workloads will use for PersistentVolumeClaims.
Part V: Creating ODF StorageClasses
The final and most useful objective so far, is to create matching StorageClass objects, which workloads can create PersistentVolumeClaims against.
-
Let's start by creating a
StorageClassfor the Ceph RBD environment. This will be your primary ordefaultStorageClassin many cases.cat <<EOF | oc apply -f - allowVolumeExpansion: true apiVersion: storage.k8s.io/v1 kind: StorageClass metadata: name: ocs-storagecluster-ceph-rbd parameters: clusterID: openshift-storage csi.storage.k8s.io/controller-expand-secret-name: rook-csi-rbd-provisioner csi.storage.k8s.io/controller-expand-secret-namespace: openshift-storage csi.storage.k8s.io/fstype: ext4 csi.storage.k8s.io/node-stage-secret-name: rook-csi-rbd-node csi.storage.k8s.io/node-stage-secret-namespace: openshift-storage csi.storage.k8s.io/provisioner-secret-name: rook-csi-rbd-provisioner csi.storage.k8s.io/provisioner-secret-namespace: openshift-storage imageFeatures: layering imageFormat: "2" pool: ocs-storagecluster-cephblockpool provisioner: openshift-storage.rbd.csi.ceph.com reclaimPolicy: Delete volumeBindingMode: Immediate EOF -
Now create a
StorageClassfor the CephFS environment.cat <<EOF | oc create -f - allowVolumeExpansion: true apiVersion: storage.k8s.io/v1 kind: StorageClass metadata: name: ocs-storagecluster-cephfs parameters: clusterID: openshift-storage csi.storage.k8s.io/controller-expand-secret-name: rook-csi-cephfs-provisioner csi.storage.k8s.io/controller-expand-secret-namespace: openshift-storage csi.storage.k8s.io/node-stage-secret-name: rook-csi-cephfs-node csi.storage.k8s.io/node-stage-secret-namespace: openshift-storage csi.storage.k8s.io/provisioner-secret-name: rook-csi-cephfs-provisioner csi.storage.k8s.io/provisioner-secret-namespace: openshift-storage fsName: ocs-storagecluster-cephfilesystem provisioner: openshift-storage.cephfs.csi.ceph.com reclaimPolicy: Delete volumeBindingMode: Immediate EOF -
Lastly, let's create a `StorageClass for the RADOS Gateway/SD environment.
RGW_GW_REGION=us-east-1


cat <<EOF | oc create -f -
kind: StorageClass
apiVersion: storage.k8s.io/v1
metadata:
  name: ocs-storagecluster-ceph-rgw
provisioner: openshift-storage.ceph.rook.io/bucket
parameters:
  objectStoreName: ocs-storagecluster-cephobjectstore
  objectStoreNamespace: openshift-storage
  region: $RGW_GW_REGION
reclaimPolicy: Delete
volumeBindingMode: Immediate
EOF
Part VI: RADOS Gateway S3 Route
There's one other thing that we need to deploy, and that's the DNS reverse-proxy route for the RADOS Gateway/S3 service. You can tweak these settings as needed in the previous section (Step 3, with the RGW_GW_REGION).
-
Use the following command/manifest to create an RGW Gateway/S3 endpoint (reverse-proxy route).
cat <<EOF | oc create -f -
kind: Route
apiVersion: route.openshift.io/v1
metadata:
  name: rgw
  namespace: openshift-storage
  labels:
    app: rook-ceph-rgw
    ceph_daemon_id: ocs-storagecluster-cephobjectstore
    ceph_daemon_type: rgw
    rgw: ocs-storagecluster-cephobjectstore
    rook_cluster: openshift-storage
    rook_object_store: ocs-storagecluster-cephobjectstore
spec:
  to:
    kind: Service
    name: rook-ceph-rgw-ocs-storagecluster-cephobjectstore
    weight: 100
  port:
    targetPort: http
  tls:
    termination: edge
    insecureEdgeTerminationPolicy: Allow
EOF
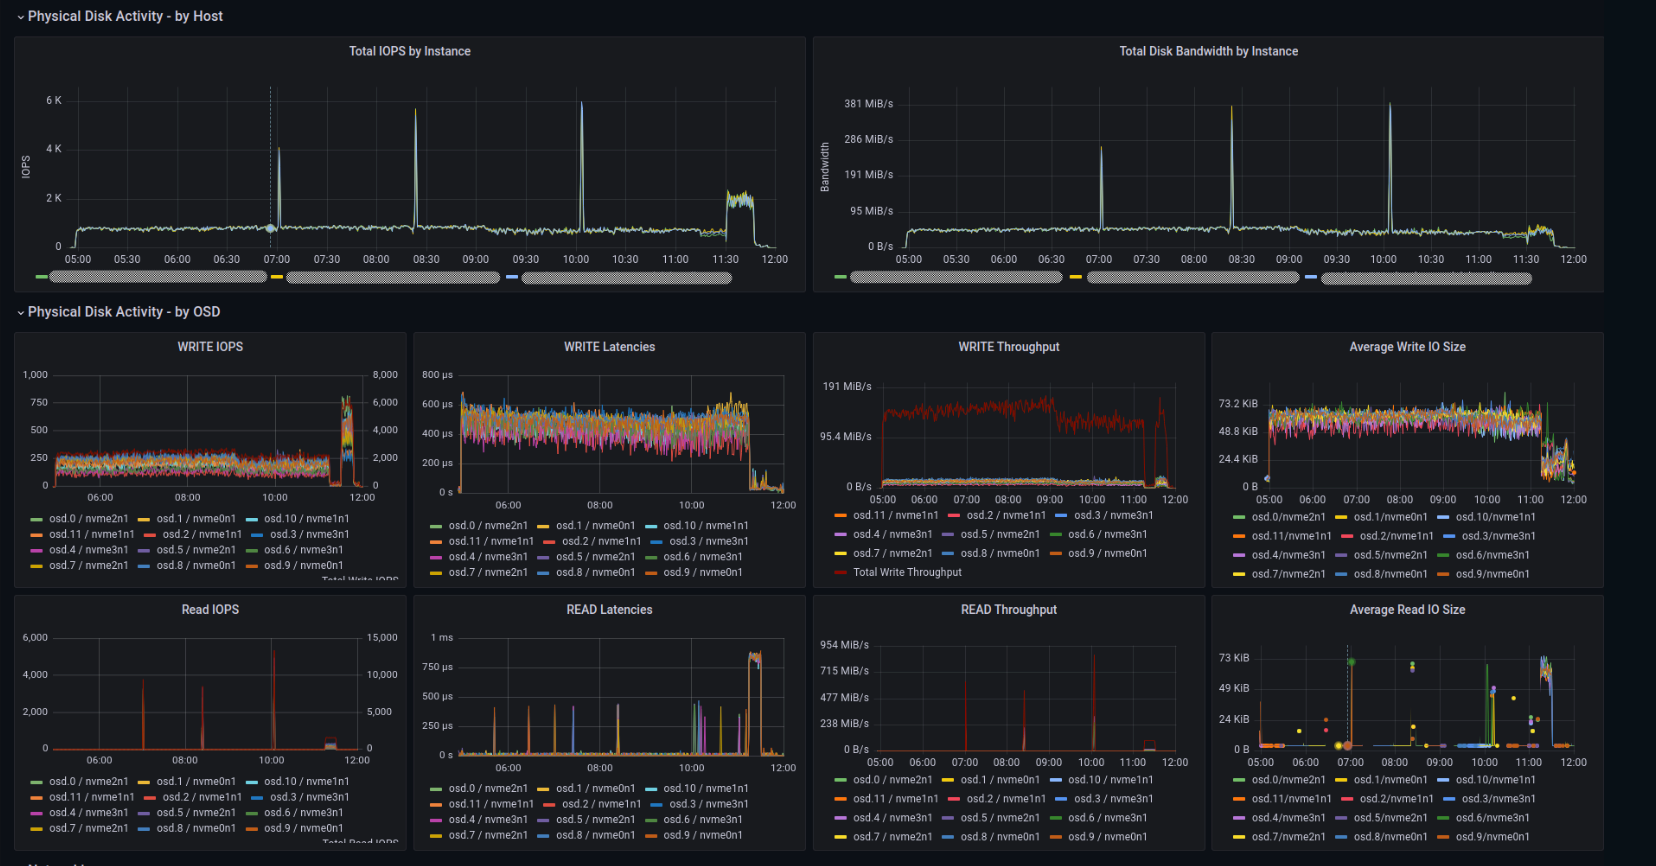
Part VII: Custom Grafana Dashboards
There's one trade-off for running the ODF operator on a SNO cluster, but it's something we are tracking in a TODO list (below). At this point, the ODF console will not work in a SNO cluster. But there's a really nice (perhaps better) workaround!
The Red Hat Performance Team works on all sorts of things related to performance testing for Red Hat products. One thing that they do is collect data, and then present that data in reports throughout the year. Well, because Red Hat is an open source company, we of course provide these tools on GitHub! So that's what we're going to use in place of the standard ODF dashboards. You'll have to share your thoughts about them, after you've used them for a while.
The provided dashboards in the repo provide visibility of these metrics for ODF:
| Dashboard | Panels | Metrics |
|---|---|---|
| Ceph Overview | Ceph Health | Displays the overall health of the Ceph cluster using a status indicator (OK, WARNING, ERROR). |
| OSD Nodes & OSDs | Shows the number of Object Storage Daemons (OSDs) and the nodes hosting these OSDs. | |
| Cluster IOPS & Throughput | Provides real-time data on IOPS and throughput, critical for monitoring storage performance. | |
| Raw Capacity & OSD Size | Highlights the raw storage capacity available and the size distribution of the OSDs. | |
| Cluster Capacity Usage | This shows total, used capacity, and a threshold warning for nearing full capacity. | |
| Noobaa Overview | Noobaa Health | Reflects the health status of Noobaa using a status indicator. |
| Buckets & Object Count | Provides insights into the number of storage buckets and objects in Noobaa. | |
| Data Reduction & Savings | Displays the effectiveness of Noobaa's data reduction techniques, showing storage savings. | |
| Noobaa Provider R/W OPS & Throughput | Tracks read/write operations per second and throughput across Noobaa providers. | |
| RGW Overview | RGW Daemons | This shows the count of active Rados Gateway daemons for the Ceph Object Gateway. |
| Radosgw CPU Core Usage | Tracks CPU usage across all Rados Gateway pods, ensuring efficient resource use. | |
| Rados Gateway Throughput | Provides real-time tracking of the throughput handled by the Rados Gateway |
Let's get started with the install!
NOTE: Before running the playbooks, ensure you have installed the Grafana Operator on your cluster, verify the operator has access to your other namespaces, you may use the OpenShift Console or helm with the command:
helm upgrade -i grafana-operator oci://ghcr.io/grafana/helm-charts/grafana-operator --version v5.12.0
-
First, create a variable for the path where you want to store the project. For me, I'm going to drop them in my normal code directories on my MacBook Pro.
PATH_CODE=/Users/bjozsa/Documents/code/src/github.com mkdir -p $PATH_CODE/redhat-performance -
Next, simply clone the repository to that new directory and change to that directory.
git clone https://github.com/redhat-performance/odf-grafana.git $PATH_CODE/redhat-performance/odf-grafana cd $PATH_CODE/redhat-performance/odf-grafana -
The next step requires two tools. First, is Ansible, because Ansible is pretty awesome and that's what this project leverages. (I suggest using
brew, or homebrew to get these tools installed).brew install ansible -
The next is a utility called
pwgen. Make sure this is installed as well.brew install pwgen -
Finally, run the Ansible playbook! That's really it.
ansible-playbook deploy-grafana.yml
Part VIII: Removal
Removing Custom Grafana Dashboards
Removing the custom Grafana dashboards are really straight-forward. Run the following command to remove the custom dashboards, as well as remove the Grafana community operator.
Be extremely cautious, in case you have other things that need/require Grafana! If you have custom dashboards using the upstream community version of Grafana, you may need to make some additional considerations which are outside of the scope of this guide.
PATH_CODE=$HOME/Documents/code/src/github.com

mkdir -p $PATH_CODE/redhat-performance

git clone https://github.com/redhat-performance/odf-grafana.git $PATH_CODE/redhat-performance/odf-grafana

cd $PATH_CODE/redhat-performance/odf-grafana

ansible-playbook -e grafana_namespace=perfscale purge-grafana.yml
Removing OpenShift Storage
First, you must check and remove any PersistentVolumeClaims that may be deployed. Find out if you have any currently deployed with the following command:
❯ oc get pvc -A
NAMESPACE           NAME                           STATUS   VOLUME                                     CAPACITY   ACCESS MODES   STORAGECLASS                  AGE
default             test                           Bound    pvc-8c7f6709-ecc7-4271-8611-7bcf6f1e05e1   1Mi        RWO            ocs-storagecluster-ceph-rbd   4h34m
openshift-storage   ocs-deviceset-0-data-0-n89zj   Bound    local-pv-sdb                               100Gi      RWO            localblock                    4h40m
openshift-storage   ocs-deviceset-0-data-1-jrxfj   Bound    local-pv-sdc                               100Gi      RWO            localblock                    4h40m
So in the example above, we obviously have one (taken from our instructions earlier). Remove this, as well as any other PVCs prior to moving on...
❯ oc delete pvc -n default test
persistentvolumeclaim "test" deleted
Next, we want to remove the storagecluster object using the following commands/example:
NAME_STORAGECLUSTER=ocs-storagecluster

oc delete storagecluster -n openshift-storage $NAME_STORAGECLUSTER
With that remove, we just need to clean up our environment. Do this by removing the remaining configmap., storageclass, and persistantvolumes.
oc delete configmap -n openshift-storage rook-config-override
oc delete storageclass localblock
oc delete pv local-pv-sdb local-pv-sdc
Now you can remove the core components which make up the OpenShift Data Foundation operator by removing the CatalogSource, OperatorGroup, and ClusterServiceVersion.
oc delete CatalogSource -n openshift-marketplace ocs-catalogsource
oc delete OperatorGroup -n openshift-storage openshift-storage-operatorgroup
oc delete ClusterServiceVersion -n openshift-storage ocs-operator.v9.9.0
Next delete the remaining rook-ceph-tools pod that we created (which tweaked the operator for running on SNO).
oc patch OCSInitialization ocsinit -n openshift-storage --type json --patch '[{ "op": "replace", "path": "/spec/enableCephTools", "value": false }]'

oc delete deployment rook-ceph-tools -n openshift-storage
Lastly, we can remove the project/namespace openshift-storage:
oc delete project openshift-storagePart IX: Testing
Confirm StorageClass Creation
You can verify that the StorageClasses required for ODF are correctly created and configured as a test.
- Create the necessary StorageClasses as outlined in the guide.
- Use the OpenShift web console or
octo list the available StorageClasses. - Ensure that the StorageClasses are properly configured with the correct parameters.
Expected Result: The StorageClasses should be visible in the SNO
Final Thoughts
TODO
- Include more testing scenarios
- Create overview to verify dashboard functionality after playbook deployment