Virtualization Management on RHEL, CentOS, and Fedora
Author: Brandon B. Jozsa
So you got yourself a capable server or workstation, and you want to maximize the compute potential, right? One great way of doing this is to leverage libvirt. It's important to understand that libvirt is really an open source API used to manage a range of technologies such as KVM, Xen, QEMU, and even VMWare ESXi. I will get into particulars about virtualization and the differences between all of these technologies in another article, but for now let's cover how to install libvirt and qemu-kvm for Red Hat variants of Linux and it's general usage, as this guide is part of a much bigger series on GitOps for Infrastructure and Zero Touch Provisioning.
Table of Contents- Part I: Installation
- Part II: Configure Networking
- Part III: Configure Storage Pool
- Part IV: Create Virtual Machines
- Part V: Managing Virtual Machines
Part I: Installation
Installation is really straight-forward. To set up virtualization on any Red Hat platform, simply use the following command:
(Note: use the -yy flag below, which is auto-installing)
sudo dnf module install virt -yFor Fedora 34+ you can use the following command (instead):
sudo dnf install @virtualization -yOk, folks that's it! You're done, and have a nice day.
But wait...there's more.
I want to cover additional tasks like creating disks, and advanced virtual-machine management. So let's use the following installation commands instead:
(Note: use of the -yy flag below)
sudo dnf install bind-utils libguestfs-tools cloud-init -yy
sudo dnf module install virt -yy
sudo dnf install virt-install -yy
Additionally, if you want to use the Cockpit UI, which I would recommend, add the following commands:
(Note: use of the -yy flag below)
sudo yum install cockpit cockpit-bridge cockpit-machines cockpit-storaged -yyNow enable the service to start, and run after each reboot:
sudo systemctl enable libvirtd --nowPart II: Configure Networking
Preface to this section:
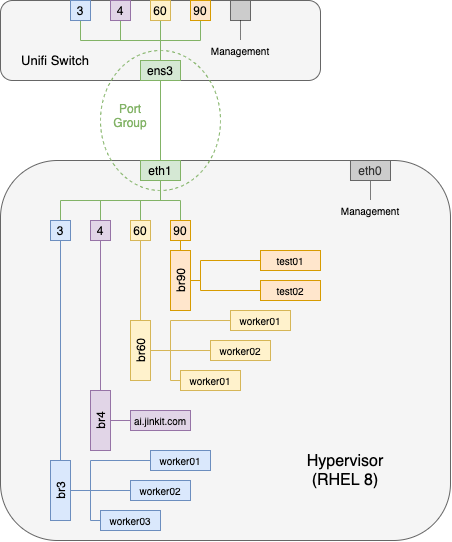
Everyone's networking needs are be different. I want to explain my networking needs, when it comes to my hypervisor setup before we get into the configuration details. I believe that with a bit of reasoning, you can adapt this to your requirements.
I have some personal requirements for any hypervisor in my lab:
- VLANS: It must be able to attach virtual machines directly to VLANs
- Bridges: When configuring VMs using
virshtools, we will need to attach a bridge interface (more on this down below).
Below is a diagram of what I want the hypervisor to support.
From an nmcli standpoint, it will look like this: I will provide nmcli commands either later, or in a separate post (I'm still trying to decide which is best).
[bjozsa@itamae ~]$ sudo nmcli con show
NAME        UUID                                  TYPE      DEVICE
eno1np0     dbf7c279-0cf1-4a42-a94c-22f0c3c174fd  ethernet  eno1np0
br3         65184c95-64c0-4ac2-8c54-3d2f14fe7709  bridge    br3
br4         8b7d3f9a-17de-41d8-8e80-3e6948352bc7  bridge    br4
br60        7faa5304-aac4-47e8-9a9a-d941bade7a04  bridge    br60
br90        c5d2d3c7-6d9e-4771-83b4-aad96901b645  bridge    br90
virbr0      1d60dd78-6a21-46c9-ab38-5a13c860053d  bridge    virbr0
virbr1      81c7b7d3-a40f-4b3a-995b-34f4a6e8ecb7  bridge    virbr1
eno2np1.3   861a92df-b9bb-488c-aea6-36e2d87a20cc  vlan      eno2np1.3
eno2np1.4   ca695cb3-cbf1-493f-ad80-7ab8a79d958d  vlan      eno2np1.4
eno2np1.60  e54f5960-c703-4c06-aa3f-49186cf8a8a9  vlan      eno2np1.60
eno2np1.90  5dc9f526-0fe2-4b92-a293-692a733314a4  vlan      eno2np1.90
vnet10      f90fef9e-6a9f-4609-b699-b19b317da27c  tun       vnet10
vnet11      1d3c92c2-a400-437f-bdb7-e4cd680d1729  tun       vnet11
eno2np1     b6a365b9-8122-49b1-a10d-f5a3f9d81ede  ethernet  --
[bjozsa@itamae ~]$
Considering these requirements, let's move onto the configuration of the bridges using virsh. I repeated this for each of my bridge/VLAN networks:
(Note: change the variable of NAME_BRIDGE to your own bridge interface)
export NAME_BRIDGE=br3

mkdir -p ~/virsh-configs/networks/
cat << EOF > ~/virsh-configs/networks/${NAME_BRIDGE}.xml
<network>
  <name>$NAME_BRIDGE</name>
  <forward mode="bridge" />
  <bridge name="$NAME_BRIDGE" />
</network>
EOF
Then issue the following for each of your networks:
sudo virsh net-define ~/virsh-configs/networks/${NAME_BRIDGE}.xml
sudo virsh net-start ${NAME_BRIDGE}
sudo virsh net-autostart ${NAME_BRIDGE}
List out the newly created networks with the following command:
[bjozsa@itamae libvirt]$ sudo virsh net-list
 Name        State    Autostart   Persistent
----------------------------------------------
 br3         active   yes         yes
 br4         active   yes         yes
 br60        active   yes         yes
 br90        active   yes         yes
 default     active   yes         yes
 openshift   active   yes         yes

[bjozsa@itamae libvirt]$
Part III: Configure Storage Pool
The next really important thing that you will need to configure is the storage pool that the virtual machines will use. I'm going to keep things fairly basic for now, but I may come back and expand this section a bit later so stay tuned. Just know that there are many types of storage pools that can be defined, whilst the one we're going to use in this post is going to be a directory, or dir pool. For more information about different pool types, have a look at the libvirt documentation.
Directory Pools
Two pools that are commonly used on Red Hat systems are:
boot- Typically where boot media is storedimages- Typically the default pool, where virtual machine images are located
The images pool will likely be the default pool when listing out sudo virsh pool-list --all. Make sure that you have a default and boot pools flagged as both an active state, as well as autostart.
[bjozsa@itamae libvirt]$ sudo virsh pool-list --all
 Name      State    Autostart
-------------------------------
 boot      active   yes
 default   active   yes

[bjozsa@itamae libvirt]$
Modifying the Default Pool
If you wish to modify or add additional pools, use the following example or check the libvirt documentation.
sudo virsh pool-define-as default --type dir --target /var/lib/libvirt/sushy-host
sudo virsh pool-autostart boot
sudo virsh pool-start boot
Boot Media
Great! Before we begin with creating a virtual machine, let's download an ISO that we want to use for our installation media.
DOWNLOAD_URL='https://download.fedoraproject.org/pub/fedora/linux/releases/34/Server/x86_64/iso/Fedora-Server-dvd-x86_64-34-1.2.iso'
DOWNLOAD_NAME="Fedora-Server-dvd-x86_64-34-1.2.iso"
sudo sh -c 'curl -k -L '"${DOWNLOAD_URL}"' -o /var/lib/libvirt/boot/'"${DOWNLOAD_NAME}"''
Create Virtual Machine Image
Now it's time to create the disk image that the virtual machine will use.
sudo qemu-img create -f qcow2 /var/lib/libvirt/sushy-host/tuna.qcow2 200GPart IV: Create Virtual Machines
Now we can put everything together to create our virtual machine.
virt-install \
  --name=tuna \
  --ram=33384 \
  --vcpus=8 \
  --cpu host-passthrough \
  --os-type linux \
  --os-variant rhel8.0 \
  --noreboot \
  --events on_reboot=restart \
  --noautoconsole \
  --boot hd,cdrom \
  --import \
  --disk path=/var/lib/libvirt/sushy-host/tuna.qcow2,size=20,pool=default \
  --disk /var/lib/libvirt/boot/Fedora-Server-dvd-x86_64-34-1.2.iso,device=cdrom \
  --network type=direct,source=br3,mac=52:54:00:25:83:a9,source_mode=bridge,model=virtio
Additionally, if you want to add remote VNC capabilities to your virtual machine (with password, of course) then you can add the following!
--graphics vnc,port=5901,listen=0.0.0.0,password=testing123Part V: Managing Virtual Machines
Now, all of this is great but what about managing virtual machines? There are many options you can chose from, but I'm going to save these for other articles. Here are a few that you may want to consider:
- Virtual Machine Management from MacOS
- Virtual Machine Management with VirtualBMC
- Virtual Machine Management with Sushy-Emulation
So this is it for now. Stay tuned for more content coming soon!